Tuesday, May 22, 2012

A badge taxonomy

I'm now to the point where I need to create sample code for the badges step-by-step. For my testing and sample code there is a minimum of items I need to begin, these are;
  1. some graphics files for each of the badges I'd like to issue
  2. a web location describing the criteria
  3. a web location providing evidence of completion
Items 2. and 3. are fairly straight forward I just need to point at any stable URL. For the sake of building something close to real I will use some URL's that point to some real criteria and its related evidence. I will use different base URL's to add authenticity.

How do I decide on the badge taxonomy?
The new challenge is in creating a badge taxonomy that will work for my learning context and how the learning progress will advance. It does seem like I'm making the creation of some sample code way to complicated, but I want the sample to provide enough complexity to make it real.


Now I have started thinking about it, it becomes complicated, the devil really is in the details. I want a taxonomy that provides enough levels so I can differentiate between the different levels of competency, I also want to show beginning and completion. I want things to be visually appealing and easily understood. When I step outside of scout / merit badges, I begin to think more about the different levels of competency or mastery. The two that jump to mind are what is available with the martial arts with belts and those available with bronze, silver and gold awards.

The martial arts taxonomy
What I really like about the martial arts taxonomy is the range of colors, the differentiation between child and adult, the shared starting point of white, and the flexibility to the number of levels. What concerns me most in using the martial arts levels is there are too many levels. and trying to spread a curriculum across so many levels would create an unnecessary complexity in getting to completion.
Gold, Silver and Bronze taxonomy
What I like about the Olympic style awards is its simplicity. And how it has been well applied to many award systems. I remember growing up in Canada we had a gold, silver and bronze fitness badges. The amount of excitement around these badges was outstanding. And having only three levels made things simple and provided for three different levels of achievement. What concerns me most about these three awards is their relationship with competitive activities and having a 1st, 2nd and 3rd place finish. In my mind, learning isn't about competition, it's about achievement and depth of knowing. I also don't believe the gold, silver and bronze provide enough variety of colors to make the badges distinguishable.

My badge taxonomy
I often find the simple solution is often the best solution. I like the use of colors as found in the martial arts approach, I believe a good use of colors will also work best on the web. I also like starting with white as the introductory level. I like having only a few levels of achievement (three or four)  for this fits well within; beginner, intermediate, advanced and master.


The taxonomy I have developed here only serves as an example of the things I have thought about and what I believe is important. I would think that their already exists many attributes within your institution, organization and approaches that should be considered when developing a badge system taxonomy. I hope this post has got you thinking about how you would create your badge system.

Friday, May 18, 2012

Open Badges: Step-by-Step

Over the last few weeks I have had the pleasure and opportunity to speak to a number of people regarding how best to onboard people to implementing the Open Badges Infrastructure (OBI). The participants of these conversations have been both Mozillians deeply involved in the project and potential partners who want to implement the OBI as a part of their project. I believe the most significant understanding from all these conversations, combined with my reading and research, is that a gap exists between wanting to implement and being able to implement. The Mozilla team in and around open badges has done a good job of putting together resources that cover the subject of how to implement. These resources can be found in four primary places;
In one particular conversation with Sunny (Product/Partner Manager, Open Badges) we talked about how best to close the gap for those who want to implement, yet are struggling to get over the first few steps of how to implement the OBI. There has already been a few people or groups who, with relative ease, have successfully navigated the documentation and source code to implemented both an issuer and displayer for badges. My investigations into why some people people have implemented with ease and others struggle is due to having specific technical understandings. The skills and knowledge required are an intermediate understanding of JavaScript, JSON and web development combined with a conceptual understanding of the roles (earner, issuer and displayer) within the OBI.

Steps to Wat San Goo, Mae Rim, Thailand.
What I really like about all this recent activity is it fits very well with where I am at in designing the OER for the OBI. I've finished the envisioning step and have moved into the planning step. And having had these conversations with a few partners and some Mozillians I have had a good amount of user and stakeholder engagement to focus my planning and design for the OER. This planning and design will focus on building educational modules to close this identified gap and engage others to support the building and testing of these modules. And to me (and I think others) the place to deploy these learning modules will be p2pu.

The proposed first steps will be (comments and feedback would be most appreciated);
  • Step 1: Claiming a badge
    Create a hands-on familiarity with badges by earning a badge.
  • Step 2: Technical Prerequisites
    Build a basic understanding of the technology behind open badges
  • Step 3: Creating your site
    Fulfill the minimum requirements of the technology needed to host the ability to issue a badge
  • Step 4: Issuing a badge
    Implement the technologies in your hosting environment to issue a badge
  • Step 5: Earning a badge
    encourage learners to claim their issued badge and store it in the backpack
  • Step 6: Managing your badges
    how to manage the badges in the backpack and make them available for display
  • Step 7: Displaying your badges
    Put together the code to display your badges
For more detail to how this step-by-step guide is progressing follow along and contribute to the wiki page; https://wiki.mozilla.org/User:Prawsthorne/StepxStep Feel free to contact me if you would like to join-in, help out or test what will be created...


Wednesday, May 16, 2012

Open Badges: What I've learned so far

Over the last couple of weeks I've begun to immerse myself in the Open Badges Infrastructure (OBI) with two main goals;
  1. Have the technical understanding to support the developer community who want to implement the OBI from the issuer, displayer and earner perspectives.
  2. To develop a complete curriculum [as an Open Educational Resources (OER)] around how to implement the OBI.
My immersion has created a number of enjoyable explorations and I believe it is this broadness to my learning that has given me the most value. I have explored every path that I have discovered, and collectively they have allowed me to understand both the technical implementation and the rationale behind the OBI. The paths and lessons are as follows;
  • open badges site - the openbadges.org site provides a great introduction to all the main concepts of open badges. It also serves as a launching pad, via the assorted embedded links, to deeper learnings across all subjects.
  • open badges wiki - the open badges wiki provides all the information the site has with much more detail and additional links and documents. Particularly important with the open badges wiki is the get involved section that provides all the references someone would need to engage with the community. Also, it is a wiki so feel free to contribute or start building pages under your profile.
  • community calls - if you can find an hour starting at 9 am PST on Wednesday, it is well worth your time to engage in a open badges community call. Also, a really good example of how distributed teams can work well together.
  • open badges google group - when the time comes venture into the google group, you will be glad you did, there is great depth to the discussion threads. The discussions vary from the technical details of how to implement the OBI, through the importance of evidence, the idea of a federated backpack, to how to design the assessment. all good!
  • github wiki - the github wiki gets into describing the syntax and technical details of the OBI. Venturing into this wiki requires an intermediate level understanding of web development and JavaScript. Even if you don't have an intermediate understanding of things diving in can add to the learning and bring insight to how things work.
  • github widgets source code - so far my focus is on how to use the OBI (not how to contribute to the OBI). As my focus remains on the implementation side having the opportunity to review other peoples code serves learning about the OBI very well.
  • github source - so far I haven't had the need to dive into the OBI source code. To me this shows the maturity of what is available as a code base and in documentation. To develop an understanding of things I don't need to look at the source code. This may come later when I start to push the OBI capabilities, but for just wanting to earn, issue and display badges the OBI can be learned without diving into the source.
  • taking apart and editing JSON files - taking apart and playing with the issuer JSON can go a long way to building understanding. Create a .json file on disk and push it into the validator. Look at each attribute and think about how it can be used.
    {
      "recipient": "sha256$2ad891a61112bb953171416acc9cfe2484d59a45a3ed574a1ca93b47d07629fe",
      "salt": "hashbrowns",
      "evidence": "/badges/html5-basic/bimmy",
      "expires": "2013-06-01",
      "issued_on": "2011-06-01",
      "badge": {
        "version": "0.5.0",
        "name": "HTML5 Fundamental",
        "image": "/img/html5-basic.png",
        "description": "Knows the difference between a <section> and an <article>",
        "criteria": "/badges/html5-basic",
        "issuer": {
          "origin": "http://p2pu.org",
          "name": "P2PU",
          "org": "School of Webcraft",
          "contact": "admin@p2pu.org"
       }
      }
    }
    
  • blog posts by mozilla team members - when you come across mozillians online or through a retweet or rss feed follow through and follow them or subscribe to their feed. Often answers to you questions may come from a current or past post. Be thorough...
  • blog posts by badge followers (both critical and supportive views) - its a really good idea to seek out other views of things. And there is another side to badges, read posts that are both critical and supportive of badges. Deepening your understanding in this way helps to broaden your learning about badges.
What I've learned so far:
  1. all aspects of the open badges and Mozilla learning groups members are outstanding. They are incredibly helpful!
  2. you need to iterate around all the sites, groups, resources and references you can find. And loop around for second and third readings.
  3. you need to be an intermediate level developer with confidence around JavaScript
  4. you need to know a web programming language (Ruby, PhP, Python, Etc...).
  5. Deep diving into the json files forces a deeper understanding of the OBI.
  6. you need to be able to create a nice looking badge and save it as a png file.
  7. you need to understand assessment approaches.

Tuesday, May 15, 2012

Open Badges: Issuer vs. Displayer

Discussions, readings, review and reflection continues to deepen my understanding of the Open Badges Infrastructure (OBI). One item that is important, and has been given considerable thought by the Open Badges team, is the difference between an Issuer and a Displayer. As you start diving into open badges it could make sense that the issuer and displayer could be the same entity. It kind of makes sense; if Girl Scouts Canada issued a whole lot of badges to someone, why wouldn't they also provide the feature to display the badges that had been awarded to this person (the earner)?

vista mar girl scouts 1964
http://www.flickr.com/photos/eezpictures/3299183408/
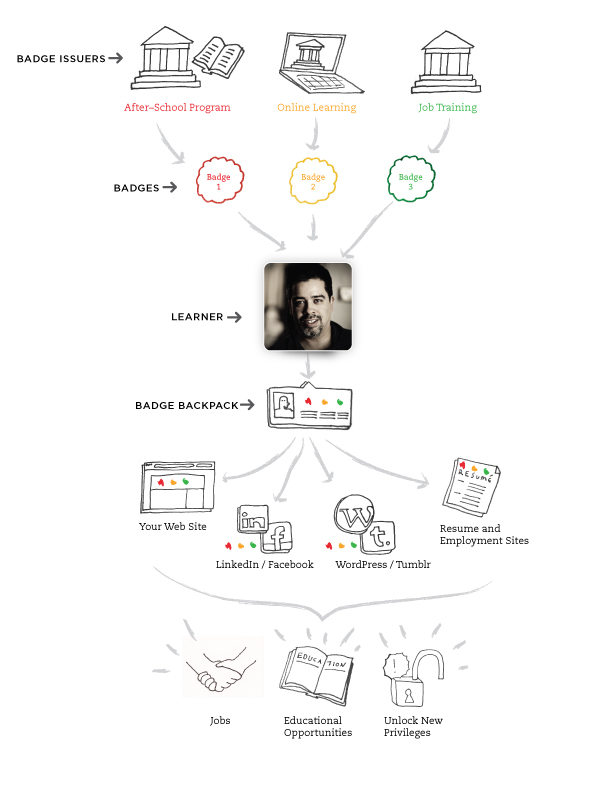
The scout badge analogy continues to work well here. Once a badge has been issued to someone, where they display them and what they do with them through time is really up to the person who earned the badge. Upon reflecting on this I believe it would NOT make sense to leave the badge sash at the scout office because every time the badges were to be displayed the viewer would have to go to the scout office to see them. The better solution is to decouple the issuing of badges from the display of badges. This way the earner can choose how to display the badges for themselves;
  • Determine where to display their badges (personal blog, facebook, other...)
  • Grouping the badges (volunteer activities, webmaking activities, professional development, community involvement, learning milestones, coursework, etc...)
  • Organize badges from different issuers to create a greater meaning (or meta-credential)
Even though having the issuer and displayer be the same entity is technically possible, it is a better solution to keep these two separate. This will allow the earner greater control over their badges and how and where they display them. 

Tuesday, May 08, 2012

Open Badges Interdisciplinary Opportunities

I'm still deeply entrenched in planning my Open Badges curriculum. And all this writing and reflecting has deepened my understanding of the OBI. The other day I took it upon myself to add to the Mozilla wiki page that describes getting started with open badges. This was a lot of fun and shows that my understanding of open badges has come a long way in a short time. That really is the spirit of Agile Instructional Design. Your personal learning begins the moment you commit to learning a subject and can very quickly develop into a deepening understanding.One of the tasks within the planning step of Agile Instructional Design requires some time looking for interdisciplinary opportunities.

To increase and broaden your learning it is also a good idea to bundle your personal learning across subjects you have already personally committed.The idea being that if your learning crosses subject areas it will deepen for the skills and knowledge are being used more broadly and within different contexts. Currently, my ongoing learning covers two main subject domains; folk music and dance, and mobile first web development. In each of these two areas I am currently focused on the following;
  1. Folk Music and Dance
    • I'll go enlist for the sailor - beautiful tune with a nice dance jig
    • Folk style percussion instruments - well almost anything folk that can add rhythm
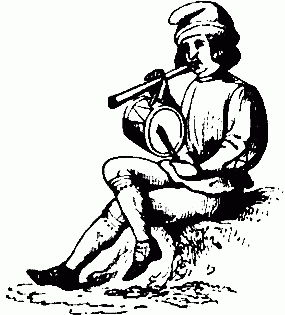
    • Pipe and Tabor - if I had the time, I'd spend two hours a day blowing this whistle
  2. Mobile First and related Web Development
    • HTML5 - the latest (and most mobile friendly) version of HTML
    • CSS - the always improving cascading style sheets
    • Advanced PhP - mostly focused on building RESTful API's
    • node.js - currently deepening my understanding of this JavaScript framework
    • popcorn maker - hacking rich media into stories and music videos
The above list really are the things I spend my free time learning about. Of these I could include the following interdisciplinary opportunities to deepen my learning within open badges;
  1. HTML5 and CSS3 to render the User Interface for my badge displayer
  2. node.js to build my server side code for the issuer and host the backpack
  3. popcorn maker to create some rich media learning resources describing the OBI

Friday, May 04, 2012

Agile Instructional Design: PLAN

A while back I wrote a post that elaborated on the flowchart I had embedded in a paper on how I envisioned Agile Instructional Design (AID). As I wrote the post I realized there was to much information for a single post. I provided a high level description of the AID flow within the first post with the promise to provide detailed descriptions of each step in later posts. This post describes in detail the activities performed and outcomes desired from the PLAN step of Agile Instructional Design.

PLAN - this is the process of taking the learning vision from the previous step of the AID methodology (ENVISION) and planning the learning journey. As was previously discussed the methodology is an iterative process that can begin as soon as the first words of the knowledge domain have been identified. As planning begins it is a good idea to review the learning themes and the learner roles. It is the time while capturing and documenting the vision that planning would begin. Often within these design processes (whether individual or group) that the main planning items are easily identified early in the process. Often these are not immediately articulated; yet, this is where peoples intuition becomes apparent. As you work through the planning step items that seem most appropriate from the envisioning step bubble up and become the items of focus. These items should be recorded for the next iteration of envisioning. The steps of planning are as follows, and some of these items may change from iteration to iteration.


  1. Identify anchor subject - the anchor subject grounds the learning into a theme meaningful to the learner. A well chosen anchor will bring authenticity to learning and more deeply engage the learner through "role play" and bringing "fun" into learning. Finding an anchor that can span different course subjects (ie. science, language, history, maths, etc.) also allows the learner to explore the anchor from different perspectives which can deepen learning.

    Outcomes: a written description, rich-media artifact or some other method of capturing a description of the anchor subject. The anchor subject should provide a collection of user stories to help clarify and increase understand-ability.

  2. Caribbean Pirate Map
  3. Identify interdisciplinary opportunities and requirements - how can the anchor subject and knowledge domain as a whole span more than a single discipline? Can the learning methods, approaches and lessons be utilized so learning can occur in many different areas? If the anchor subject was "pirates" it could be discussed in all courses. Economics would talk about the financial realities of being a pirate and the greater economics of the time. Language Arts could speak to the languages of the Caribbean or the South Asian Sea. Geography could explore the different regions of the world who have struggled with piracy. History could look at piracy through time. Technology classes could look at piracy as it applies to the modern age. With a well chosen anchor subject the interdisciplinary opportunities are numerous and will deepen learning.

    Outcomes: a written list, concept map or other approach to identifying the interdisciplinary opportunities with descriptions of how they would be tied to a lesson or module.

  4. Examine timeline, instructional strategies and research - There are many attributes toward determining the instructional strategies for any module, course or curriculum being built. The following are some of the attributes to be considered;
    • Timeline and Schedule - how long is the course? the time of day? number of hours available?
    • Geography - where are learners located? is this a classroom course, exclusively online, or blended? What resources are available given the geography?
    • Access - what bandwidth is available? what technology resources are available given geographical restraints?
    • Cohort - Who is the cohort of learners? how tech savvy are they? is discussion more appropriate?
    • Pedagogical approaches - given the above restraints what will be the most effective learning environments. Should the approach be inquiry based, a MOOC, use constructivist theories or connectivist practices?
    • Previous experience - Determine if there is research available for similar learning situations. What worked? How could things be improved? 
    • Research Opportunities - Are you capturing information from this learning development project to add to the research? Are you contributing back? Are you being transparent?

    • Outcomes: a table, mind-map, story or other approach that answers all the above questions formatted in a way to deepen understand-ability.

  5. Identify learning objectives and modules - once items 1 through 3 above are completed it comes time to review all the artifacts created and gathered from this step and the previous ENVISION step to identify learning objectives and learning modules. Keep in mind being agile, so the task of identifying objectives and modules can start at any time. Having stickies or a way of recording these for later review is a part of agility. Identifying objectives and modules should be fairly straight forward if the previous tasks and steps had depth. Surprisingly, the objectives and modules fall out of the information created and gathered.

    Outcomes: a written list of learning objectives and identified learning modules. This should be published and made available for feedback and collaborative efforts.
Remember, with Agile Instructional Design it is about the designers learning and being iterative. As soon as enough information is gathered to create and start building learning modules, these modules should be built. Agile Instructional Design is iterative and shipping learning modules often is a key measure of success.

Getting started with open badges

So I added a bunch of content to Mozillas wiki page describing open badges. This page had very little content other than an image and some links. I really felt it needed to have a non-tech-savvy upgrade. I did my best to put getting started with open badges into more lay terms. With a few additional edits, this is what I ended up with...

Getting Started
Being on the steep side of a learning curve can sometimes seem overwhelming. And jumping into learning about digital badges is no different. If you iterate around three main concepts, and with each iteration deepen your understanding all will be good. If you have landed here without first reading the badges about page, it is suggested you go back and read what badges are all about; About Badges.

The Three Main Roles 
There really is a whole bunch of technology that went into building open badges. Particularly, when you consider that all badges need to be confirmed as genuine and that loads of different organizations will be issuing badges. More on this as you deepen your understanding of badges. The first thing when developing an understanding of badges is to consider the three main roles of; earner, issuer and displayer. And how these three roles work together within the whole Open Badges Infrastructure (OBI).

The Earner
The earner is anyone who wants to earn a badge. And they are willing to focus their energy and make an effort to acquire the skills and knowledge that demonstrates their mastery represented by the badge. Badges are everywhere, and are particularly present in our youth. Girl Scouts can earn badges, Students in sailing school can earn badges, Swimmers can earn badges. It is these badge systems where people prove skills, knowledge and ability and from this they earn badges. If you want to jump deeper into understanding the technology behind the earner follow this link to the technical documentation of onboarding the earner.
and their Backpack
The earner will store their badges is a digital backpack. The backpack is the online digital place where the earner can store and manage their badges. By managing their badges they can be put into groups or be made private and not be available for display.

The Issuer
The issuer creates the badge, figures out what skills and knowledge are represented by the badge, and figures out how to assess (or prove) if a person has the skills and knowledge to earn the badge. The issuer has a lot of heavy lifting to do, this is because determining if someone has mastered the skills and knowledge and are deserving of a badge requires work and should be rigorous if the badge is going to hold value.

There are may ways to assess peoples abilities and knowledge. Figuring out effective ways to assess these is also the responsibility of the issuer. The assessment methods used for the badges available in our youth are proven and have considerable rigor. For example, the assessment of the skills and knowledge to get a scouting badge is done with well articulated criteria and assessment forms within a master - apprentice model. Once the badge earner has proven their skills and knowledge against the criteria as assessed by the master, they are issued a badge. It should be noted that there are many approaches to assessment and what is described here is only one approach. The important thing is that the issuer needs to figure out how to assess if the earner is deserving of the badge. If you want to jump deeper into understanding the technology behind the issuer follow this link to the technical documentation of onboarding the issuer.

The Displayer
The displayer provides the ability to display badges. This could be a social media site like facebook or it could be your own personal wordpress blog. The displayer will retrieve badges from an earners backpack and display them for all to see. The groupings and permissions around the display of badges will be determined by the settings in the backpack. If you want to jump deeper into understanding the technology behind the displayer follow this link to the technical documentation of onboarding the displayer.

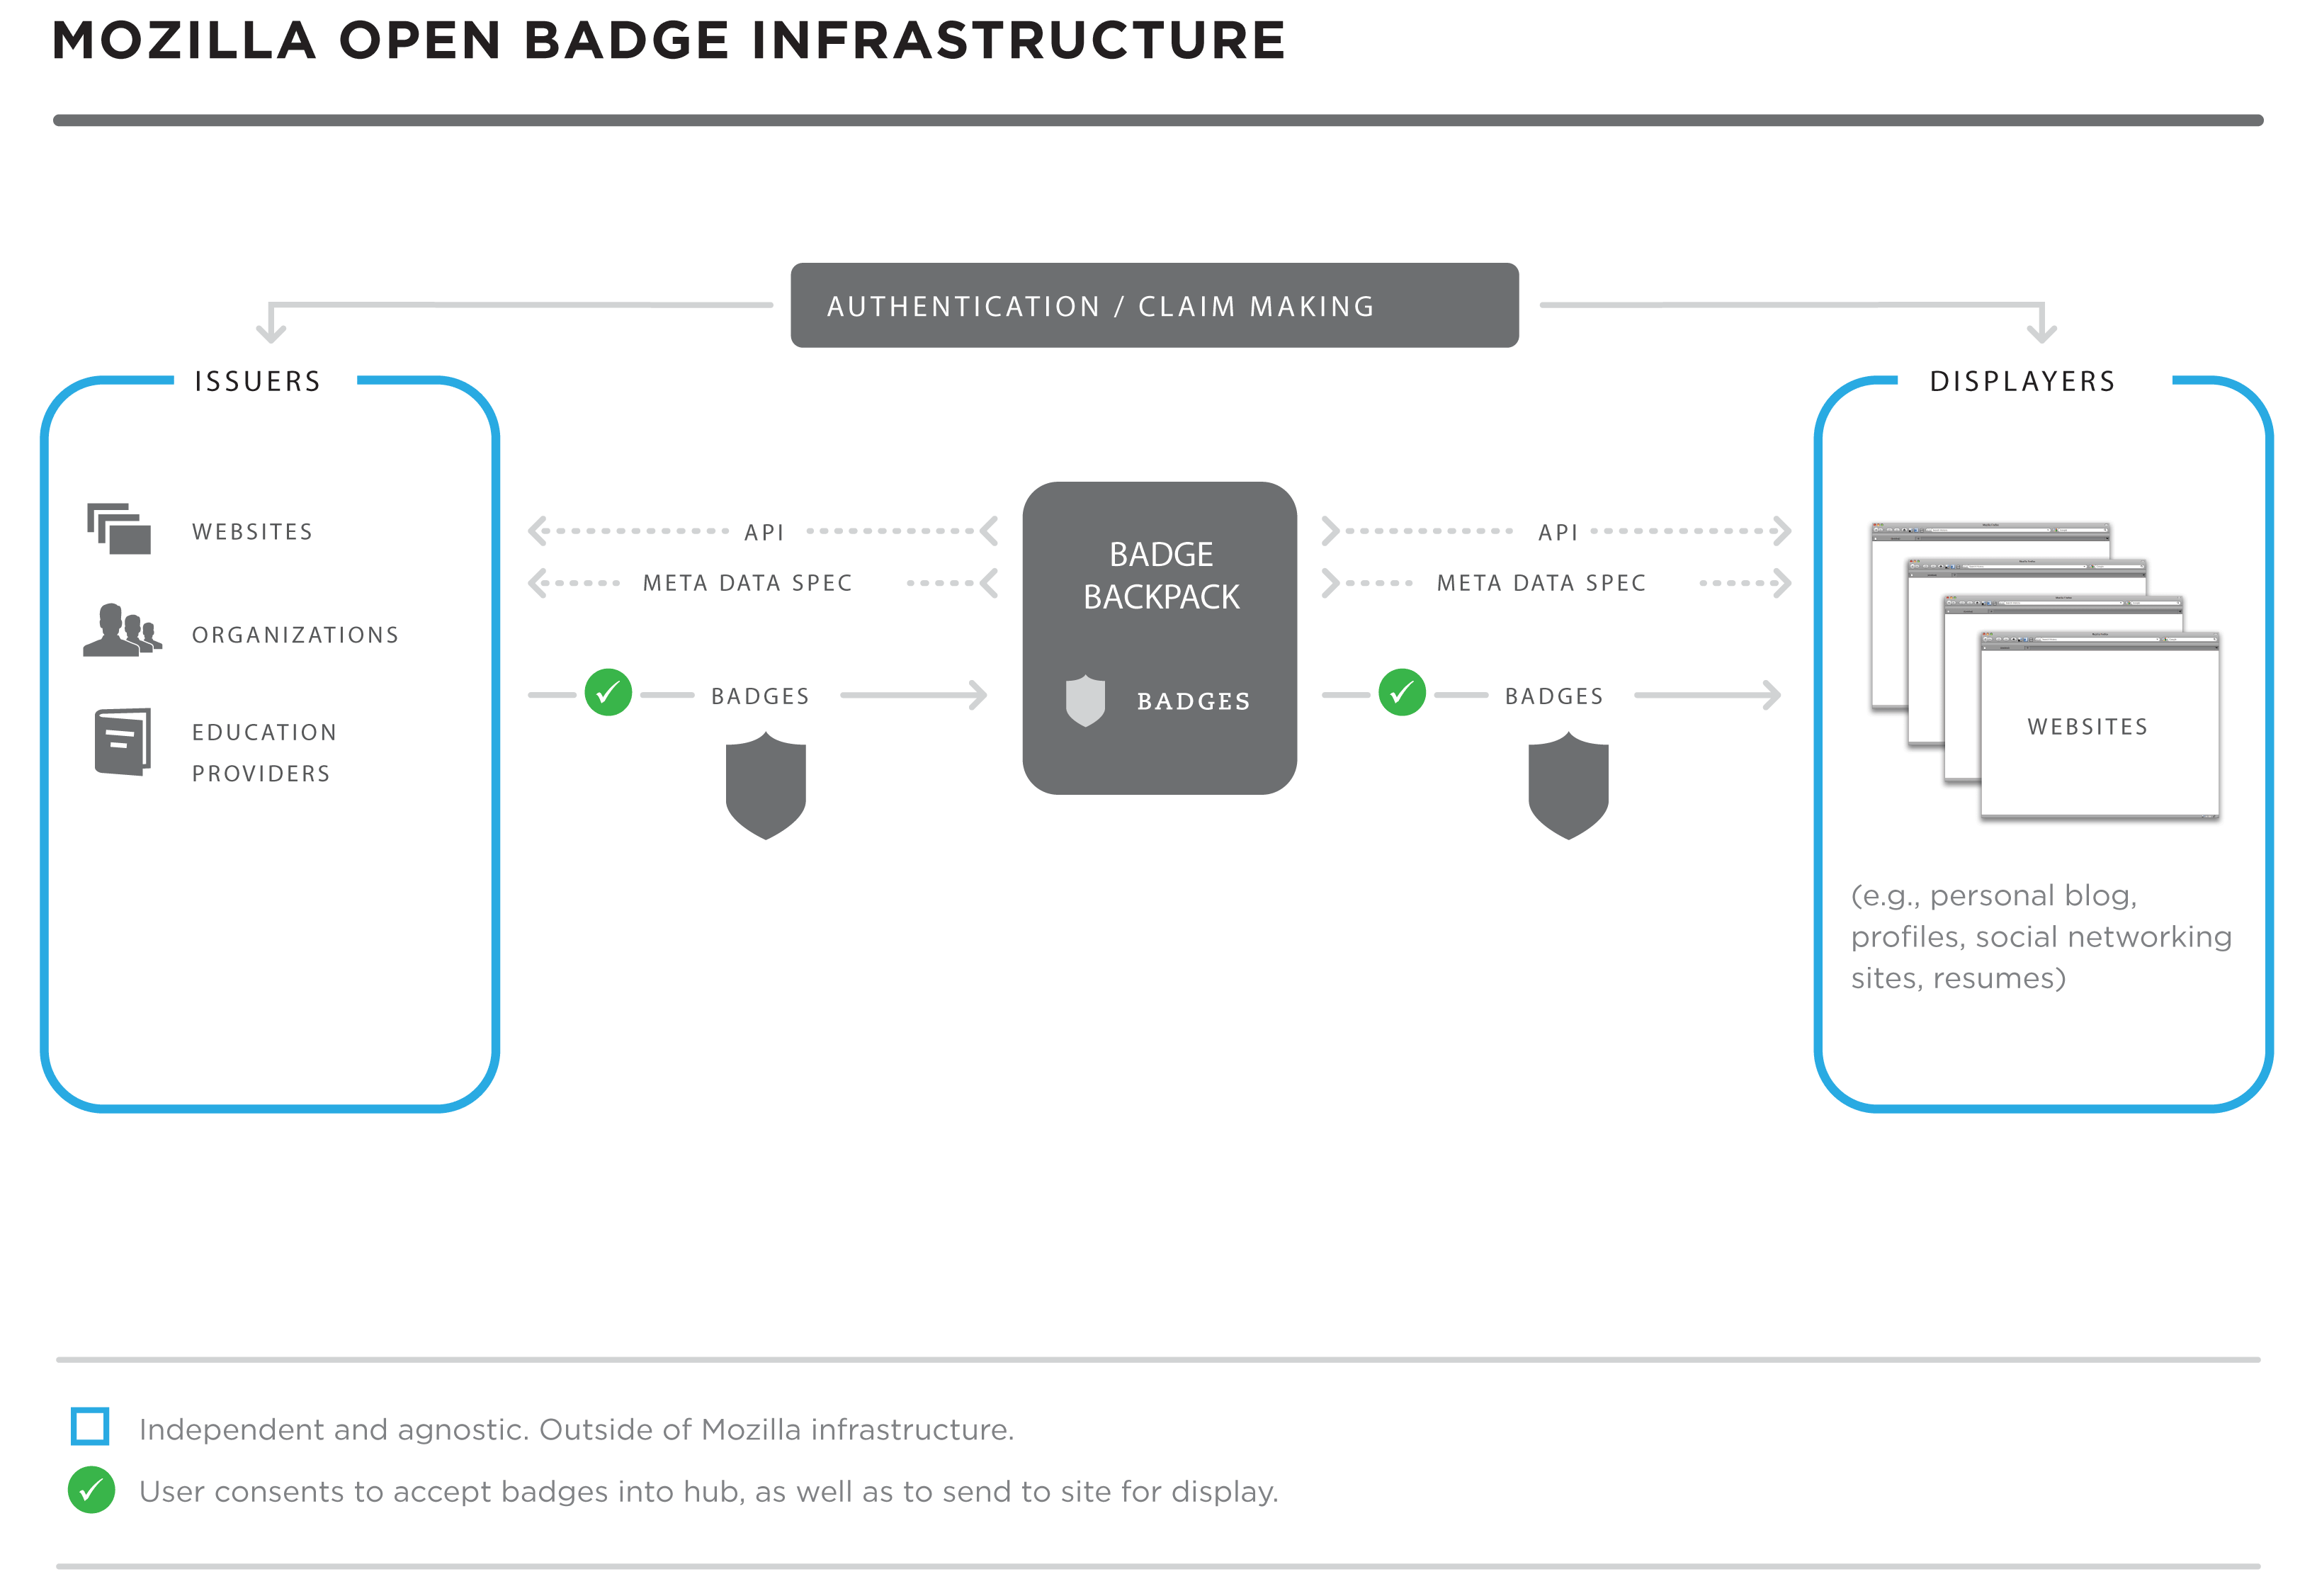
The Technology
These three roles can be found in the diagram enclosed. The Issuers and Displayers are obvious as they each have their own box in the diagram. The Earner role isn't so obvious because, as a technology, the earner becomes the backpack. You could say the Earner is holding their backpack. From a technology perspective and an infrastructure view the Issuer is the provider of badges, the backpack stores the badges earned and the displayer shows them to the world. 

With a close inspection of the diagram above there are a number of boxes, lines, images, and text. All of these represent a piece of the technology that makes up the Open Badges Infrastructure. As you learn more about the badges technology you will become familiar with all the elements found in the diagram. Take the time to review the diagram, reflect upon the Earner, Issuer and Displayer roles and how they would interact to display a badge.

One question to really get you thinking is. "How do you determine if a badge is genuine?" Don't think about this from an open badges technology perspective, think about it from a real world girl scout badges or sailing school perspective. Think again, think further than if the badge looks official... "how would you really determine if a badge is genuine?"

Friday, April 27, 2012

Open Badges Anchor Subject

It would seem to me that Scout badges would be a great anchor subject to focus the development effort for creating online learning resources for the OBI. To simplify things I will focus on the adults who have earned scout badges in their youth and would like to bring them forward into the digital world. The nice part of this is I don't have to deal with the under-age privacy issues that could appear within this anchor subject. Yet I have a mature source for badges with well defined assessment and award processes available. The scouts Canada site already has digital copies the badges within their store.


Use Cases
Using scout badges as my anchor subject will also open up all aspects of the OBI learning journey. Within it has the following high level use cases;
  • Wanting to display the scout badge (requiring a displayer service to be implemented)
  • Wanting to earn the scout badge (which will bring assessment into the learning discussion)
  • The ability to issue the scout badges (this would tie the issuing of the digital badge to the assessment. And kick-off the learning around assertion)
The technology
As with most of my current web development I will be using a mobile first strategy. This development / OER creation effort will also include a browser based portal, but the idea of implementing a mobile sash to display my scout  badges seems kinda cool to me.

Tuesday, April 24, 2012

Curriculum Envisioned for the OBI Developer

So I have taken it upon myself to build some learning resources for the Open Badges Infrastructure (OBI). The idea being that there is going to be a very large number of web developers wanting to deepen their understanding of the OBI. And onboarding all these developers is going to be a lot of work for Mozilla and the Open Badges team. So given my tenured technical background and my experience as an educator and instructional designer I figured the best way to help out is to develop some OER to assist the developers in learning the OBI.


My approach is to utilize an Agile Instructional Design approach and build some OER for the OBI. To start I have envisioned what the subject domain is about, have identified learning themes and the profile(s) of the learners engaging with these learning resources. All this comes in three (well four) posts, they are;
  1. The Open Badges Concept Map which defines the subject area from an introductory perspective.
  2. The Open Badges Learning Themes that will focus the OER module development.
  3. The Open Badges Learner Roles that identify the learner profiles so the resources are developed toward the right target audience.
  4. And the Open Badges Learning Plan which is my commitment to building the learning resources for the OBI.

Open Badges Learning Themes

To complete the envisioning step of Agile Instructional Design is to determine the main themes of learning. These themes are derived from the concept map, which was created from a quick review of the subject domain of open badges. It is for these themes that learning resources will be built. The themes are as follows;
  1. Who or What is the Badge Issuer? What do they need to exist? What technology do they need in place? What code, if any do they need to write to be an issuer?
  2. Who is the Badge Earner? How do they earn a badge? Where do they store their badges? As an earner is there technology i need to know how to use or code?
  3. Who or What is the Badge Displayer? What do they need to exist? What technology do they need in place? What code, if any do they need to write to be an displayer? Can a displayer also be an issuer?
  4. What technology Platform is required? How would I host an issuer, earner or displayer? Could I hack the platform myself? What specific technology skills are required? Would learning the following three technologies be enough to contribute to and utilize the OBI?
It is answering all these questions, are more, that will be the learning themes of the OBI for developers course being built from this initiative. Stay tuned as I move into the planning phase for this courses creation.

Open Badges Concept Map


Keywords
  • Open Badges Infrastructure (OBI) - the OBI is the technology platform which hosts the important aspects of the badges out on the internet. This github wiki page has a really good diagram of the OBI.
  • digital badge - the digital badge is the online equivalent of the traditional badge for achievement. Think girl or boy scout badges. You prove mastery of something, you get a badge.
  • digital backpack - the digital backpack is like the sash for the scout badges. It serves as an online place to store, manage and organize your badges.
  • baking - baking allows every badge to also include information about the badge, beyond the graphical design of the badge. The baking also creates digital integrity "baked" into the badge
  • issued - badges are issued by a group, institution, master, supermentor, online university, learning community, etc. Any organization who has skills and knowledge they want others to possess can issue badges. These organizations / communities should be considered badge issuers.
  • displayed - badges can be displayed separately from the issuer. Online references can be made to badges in a backpack and they displayed. Facebook or LinkedIn can be displayers.
  • earned - badges can be earned by learners. An issuer will create, or be associated with, learning environments and once a learner has demonstrated competencies they can earn badges.
  • asserted - the validity / integrity of badges can be asserted against a badge "authority". The main idea being; is the badge for real? does it link back to a solid set of curriculum? is the issuer valid? did the person really earn this badge? It is these kind of integrity checks that are derived from a badge assertion. More on this later...
  • png files - the graphical images of badges are png files.
  • json metadata - is data about the badge that can be stored as part of the actual badge. This links back to the baking of a badge.
  • node.js - is the software system that open badges has been built
  • mysql - is the database used for open badges
  • github - is the software management and developer community platform for open badges.
If you want a more detailed listing of concepts and keywords associated with open badges I suggest you review this page on the mozilla wiki; https://wiki.mozilla.org/Badges/infrastructure-tech-docs

References

Open Badges Learner Roles

One of the early steps within Agile Instructional Design is to identify the learner roles. Identifying the learner roles is about audience and context. Identifying the audience for learning is very important, for they will dictate the literacy levels, the breadth of knowing, the audience determines the appropriate stories and anchors. It is also important to identify the roles from all sides of the learning engagement; learner, facilitator, teacher, peer, subject mater expert, etc. And giving the roles human names, descriptions, and avatars will help learners to connect to the roles and the stories they participate. Context also has a big influence over stories and anchors. Is it professional development or graduate level academics? Is it in an urban surrounding or rural? Is the learning building on previous learning?

The outcomes for this task are the user role descriptions. These could be cards or full pages describing each role with details of breadth of knowledge, background, role within the learning experience. For this iteration of building curriculum for Open Badges I will focus on two roles;


Educational Technologist - Grace Jones

http://www.flickr.com/photos/falsecognate/
Grace has a masters of education technology and an undergraduate degree in biology. She is an experienced education technologist who is very proficient with open source technologies. She has over 12 years experience working in both academic and professional development settings. Her preferred development environment is working on LAMP based servers using PhP as her primary development language. She has an intermediate understanding of the MVC pattern, and is just getting started with HTML5 and CSS3. She considers herself a beginner JavaScript programmer, and has begun learning Node.js in preparation for implementing three badges based projects for different clients. Currently she has two primary jobs; one as programmer for the Instructional Development Office of a large University and the other is an independent consultancy where she contracts as an instructional designer and solutions developer.


Independent Learner - Mandeep Rhandawa

http://www.flickr.com/photos/whatleydude/
Mandeep is a geologist by training and profession. He possesses two undergrad degrees; one in geology and the other in soils engineering. Mandeep is a tinkerer, he enjoys playing around with and hacking the web. Mandeep has no formal programming background, though he has developed a beginner proficiency with hacking the web through taking a couple of free online courses and hacking a lot of code. On his free time he has explored many subjects and completed many online learning activities. He is prone to engage in different free and online learning activities. he is a member of five different communities of practice within varying subject domains. The idea of earning badges to legitimize his online learning appeals to him, he would like to hack the OBI to create a full backpack and to provide badges support to the communities he is a member.

Please note, both these user role characters are fictional. Any similarity to real people is purely accidental.

Sunday, April 22, 2012

Open Badges Learning Plan

I've started my journey into Mozilla's Open Badges initiative. I'm doing this because it fits so well with my beliefs and values around open education, assessment and accreditation. It really seems like the logical next step for me and my desire to assist in opening learning for everyone; outside of the traditional institutions. Don't get me wrong, I believe people can learn amazing things at traditional institutions and people should continue to engage traditional institutions. I just also believe people should be able to get as much recognition and accreditation from their learning outside of the traditional institutions. What I really value most about the open badges initiative is that they are wanting to offer an infrastructure (and I believe the infrastructure is key) that is open to everyone and doesn't end up focusing its efforts on higher education institutions (OER based or otherwise). In Mozilla's description of their open badges initiative it is also key that they support all areas of learning. It is this that I value most.
...They can support learning that happens in new ways and new spaces beyond the traditional classroom. These include online courses, after-school programs, work and life experiences. By providing a more complete picture of learners' skills and competencies, badges can signal achievement to a variety of communities and institutions including potential employers, educational organizations and social groups... ~ http://openbadges.org/en-US/faq.html
My Approach
I will create curriculum for, and deepen my understanding of, Mozilla Open Badges by using my Agile Instructional Design (AID) methodology. I will focus on building OER for open badges from both the perspective of an education technologist and an independent learner. I will build this first set of resources as AID sprints with two iterations; the first focused on the edtech and the second on the learner.

My Learning Plan
The first task within AID is the envisioning step. This step focuses on developing an introductory understanding of the subject and creating the beginnings of a curriculum map. This is how I will fulfill the tasks within the AID envisioning step.
  1. Curriculum Plan
    Here I will create a concept map of the open badges domain. This will also include a list of the keywords found within the domain. I will gather this by quickly reviewing all the Mozilla artifacts I can find on open badges and perform a few Internet searches to try and discover any gaps.
  2. Learning Themes
    I will build upon the concept map by identifying the learning themes. One of the themes that immediately jumps to mind is the focus on issuing, storing and displaying the badge. Rather than the assessment of earning the badge. 
  3. Learner Roles
    There are two roles within this iteration; they are the edtech and the learner. I will elaborate on the roles in a subsequent post.
Feel free to follow along (or even join in) with my learning. I'll be as open as the technology will allow and contributing will assist us both in deepening our understanding of open badges.

Thursday, April 12, 2012

Our Hackasaurus Kitchen Table

Over the last week I have been preparing for a hackasaurus kitchen table event with my two boys, Lucas and Kai. My two boys are six and five, respectively. And spend a huge amount of time outside, they are not what I would consider tech savvy. This comes as no surprise as their Mom and I don't encourage technology use. They are two rural boys with way too much energy and we would them rather be outside, creating and building things. We believe there will be plenty of time to develop technology skills when they are a little older and their brains have developed into free thinking creativity machines. All this said, I still strongly believe they should develop an understanding of how Mom and Dads information appliance works.

I will often sit with Lucas and Kai and "do research" as they like to call it. This usually means choosing a subject like bats, eagles, cars, trains, etc... We usually search the web and do a little reading and then download and print a bunch of pictures related to the subject. I always insist in also downloading coloring pages of the chosen subject. Once everything is printed they settle into their art station and color the pages, cut out the photos and make 5 1/2 x 8 picture books. We then sit together and review the books, and again talk about the subject. All a pedagogically sound and age appropriate way to learn new things.

So given my ongoing curiosity about using the internet as a learning tool I have been spending some time developing an understanding of what Mozilla is up to in regards to web making and supporting online education. One of their main themes is hackasaurus, where they are teaching youth to hack the web. Good hacking, in the traditional sense of hacking. Recently they put out a call to beta test their kitchen table event. I thought what a great way to learn more about what Mozilla is up too and start deepening my kids understanding of how the web works. Kai often asks, "Why is the computer so full of information?", my response is usually to grab the network cable or point toward the wireless router and say its connected to millions of other computers and collectively they hold A LOT of information. He smiles, nods, and gives me a look of disbelief.


When I first became aware of this kitchen table event I started reading about it and understood it was more focused on the youth cohort (teenagers), though the event idea doesn't implicitly say so. Given my educational background I figured it would be a good idea to create some scaffolding for the younger kids (K3) to assist any other parents who may be considering the same thing. I built some scaffolding and published it to the Mozilla wiki. What I believe is most important is to find subjects that the kids are currently (as in right now, today!) really jazzed about. Right now Lucas and Kai are jazzed about snails. So we took some photos and hacked web sites about snails. These are the two sites we created from our hacking;
Both Lucas and Kai were so engaged, this kitchen table event was a great thing. I do believe it was important to have the K3 scaffolding, find a topic they are really excited about, and for the learning to be about the topic not about hacking the web. The hacking the web still got into their brains, and will develop further as we participate in more of the hackasaurus events. Thanks Mozilla team!

Tuesday, March 27, 2012

HTML5 by Mark Pilgrim; O'Reilly Media

I really liked this book! A "Dive into the future of web development" is exactly what the book did... Mark Pilgrim did an excellent job of covering the topic of HTML5 from end-to-end. The book doesn't do a deep dive on any of the many features of HTML5, it covers at just the right depth with lots of great examples and code for review.

The order in which the book is put together makes a lot of sense for the experienced programmer and novice programmer (it’s a long time since I was a novice programmer, yet the order makes sense from a learning perspective).  The first chapter gets into the history of HTML (or mark-up languages) which puts things into context regarding mark-up and why HTML5 is so important. After this first chapter it starts with the important discussion regarding detection and the libraries available to quickly (and simply) use detection to best utilize the available HTML5 features. After these first two “introductory” chapters it methodically and with just the right detail dives into the full breadth of the new features within HTML5. I also appreciated the non-programmer related discussion on the why and history of some of the features and related technologies. The chapter on video and codecs is a good example of this.

As I was reviewing the chapter outline of the book to be reminded of highlights, I couldn’t find any. What I mean is all the chapters describing all the features were very interesting to me. And they were all well written and easily understood. I find it hard to find fault with this book; I was looking to read a great intermediate book on HTML5, and I found it with “HTML5: Up and Running”. I’d recommend this book to any developer or designer wanting to get a good technical description (with examples) of the new HTML5 features.

Friday, March 23, 2012

OER Assessment

I believe new approaches to open assessment need to be built to handle the growing global demand for education and learning. I am not alone in my thinking. I believe there is no shortage of great OER and a growing number of approaches toward open accreditation. These approaches to accreditation follow both traditional models and those more innovative. The point I am wanting to make is; there is no shortage of good open educational materials and there are some solid open accreditation services emerging. What I believe is missing is open assessment, for assessment closes the gap between studying educational materials and receiving accreditation for that study.

Inaugural ICT4D event participants.
This post is about open assessment and the approaches that I believe will work toward creating open assessment for the masses. I also think some background on myself and why I have developed my way of perceiving open assessment is important. I haven't taken the traditional route in obtaining an education; yet, in the end I have received a Bachelors of Technology from the Open Learning Agency of BC (OLA) and a Masters of Education from Memorial University of Newfoundland (MUN). But to think it was a straight line toward these credentials would be wrong. My OLA B.Tech degree was by cobbling together a couple of technology diplomas, with University credits from three different institutions. My MUN M.Ed IT was all online, even though I spent a year on campus, all my coursework was done online. Needless to say I have often taken alternate routes toward a traditional destination.

I know one of the biggest influences in my adult life was my participation at the inaugural ICT4D event at Royal Holloway in 2006. Ever since then I have been focusing a large part of my working and volunteer efforts in blending technology and education for the greater good. The paper I presented was about what I called a "critical technologist". It is really about the role someone could take in assisting to develop capacity with ICT in developing countries. The "critical technologist" is a play on Paulo Friere's Critical Pedagogy. I am strong believer in Paulo Friere's work. The three areas of work I have done within this capacity since 2006 have been;
  • WikiEducator (2007 - 2010) - I will always look fondly upon my work with WikiEducator. I was a large  contributor at its early stages and wrote a few key pieces that are still in use today. To see my participation, review my profile; http://wikieducator.org/User:Prawstho. I was honoured and fortunate to be nominated to WikiEducator council, and in 2010 we parted ways. On occasion I still contribute to WikiEducator, though my focus is more in Wikiversity.
  • Continuing Legal Education of BC (2008 - 2011) - I was Senior Project Manager / Lead Technical Architect for a large grant to increase access to education for the lawyers of British Columbia. We used a lot of open source software and open approaches to provide a services orientation for building learning communities; This 2011 post titled "Increasing access to education", does good job describing what we did.
  • Progressive Video Assessment - I came up with this learning systems architecture in 2008 and had the opportunity to implement it in a couple of projects; AIM Language Professional and CLE Engagements Questions.
How does my educational and work experience influence how I believe OER assessment should be built? I believe it can be distilled into eight important points;
  1. It should be peer-based
  2. It should be scalable
  3. It should be fun and enjoyable
  4. It should provide many reusable instruments
  5. It should play well with others
  6. It should be reference-able
  7. It should support open data
  8. It should feed into open credentialing
I believe open assessment should be easily integrated with other approaches of assessment and credentialing. It should assist learners who are attending traditional institutions as well as alternative approaches like OERu and P2Pu. It should also support those who want to learn independently without ever stepping foot in a traditional institution (online, virtual or otherwise) or those independent learners who dont seek credentials. I really like the parallel universe approach being offered by OERu; yet, I am also concerned about the need for fees and my internal critical pedagogue is tingling. I have extended the parallel universe approach being proposed by OERu.

OERu parallel learning universe with an additional dimension.

Approaches to Open Assessment:
  • In the immediate term we should build peer-assessment to utilize and promote the use of badges (see wikieducator: http://wikieducator.org/User:Prawstho or Mozilla badges for example). This will get us going quickly and then build upon this with greater automation and other assessment approaches.
  • In the near term we should build rubrics to allow people to perform self-assessments and then submit portfolio for a peer-review. Peer reviewers should also be given badges for executing N peer reviews. This does not require a lot of automation, can be implemented quite quickly.
  • In the close term we should build formative and summative assessment instruments that can be baked into websites, apps and tools. People should be able to edit / improve on instruments in a community kind of way.
  • Beginning immediately and through the next year we should start building apps and experimenting with mass collaboration for assessment.
  • In the medium term we should build a repository of guidelines, templates, assessment instruments and approaches.
  • In the long term we should build a fun community around assessment and broadening peoples skills and knowledge regarding assessment and accreditation.
  • As an ongoing initiative we should encourage research and centers of excellence around open assessment and its relationship with open accreditation.

Tuesday, March 20, 2012

Agile Learner Design and Social Artistry

Agile techniques are increasingly finding there way into instructional design, business, management, etc. I have believed for a while that this is a good trend and that instructional design, communities of practice and social artistry can benefit greatly from agile techniques. I believe many people already use agile techniques within their practices. Within this topic of the café I would us like to explore how we use agility, nimbleness and leanness within our social artisty practices. And if these practices could be applied within the groups we work with to create deeper learning experiences.

Background:
Agile was born out of the challenges within software development. A group of seasoned software developer were seeking a better way, and they collectively created the agile manifesto; http://agilemanifesto.org/. It has been over 10 years since the agile manifesto was written and many other similar approaches have come from this... and now not only has agile become entrenched within software development practices it is also finding its way into many other practices. Some other techniques originating from agile are as follows;
Current Works:
There is a growing amount of writing with the application of agile to learning and instructional design. I believe the first reference to "Agile Instructional Design" came from a 2005 paper I wrote during my graduate studies. I consider this a poorly written paper, but the message is in the right place; http://www.rawsthorne.org/bit/docs/RawsthorneAIDFinal.pdf

What is Agile? (Day 1 - 4):
What I would like people to think, reflect and share is how agility, nimbleness and leanness apply to their social artistry practice. How do agile practices apply to Learners, CoP and Social Artistry? I'd like this done not from the agile manifesto perspective, rather the definition of words perspective. Please consider the following words and how they can be applied within Learning, Communities of Practice and Social Artistry?
  • Agile - Characterized by quickness, lightness, and ease of movement; nimble.
  • Nimble - Quick, clever, and acute in devising or understanding
  • Lean - The core idea is to maximize value while minimizing waste.
Designing our learning (Day 4 - 7):
A main theme of Social Artistry is learning, both personal and group learning. I particularly like the discussion found in this post from Michele Martin; http://www.michelemmartin.com/thebambooprojectblog/2011/11/learning-careers-and-social-artistry.html. How do we design this learning? Do Agile practices and Agile Learner Design provide a nimble way of designing learning experiences that would focus and fit well within social complexity? Could we design learning experiences to quickly build human capacity?

An Agile Instructional Design Sprint (Day 7 - 12):
Could a small group of subject matter experts, instructional designers, rich media experts and coders build a complete learning experience in five days? Could Agile Instructional Design Sprint be a great way for the social artist to bring alignment and shared understanding to a group while also producing a learning experience that would assist other to understand the work completed by the group?

Summary (Day 12 - 14):
What are the take aways for this topic? What are the strengths and weeknesses of applying agile techniques to instructional design within social artistry? Should we try a AID Sprint to build a course for the Social Artistry patterns?

Monday, March 19, 2012

Agile Instructional Design references

Agile Instructional Design in Practice (2012) - Peter Rawsthorne
http://criticaltechnology.blogspot.ca/2012/03/agile-instructional-design-in-practice.html

An Agile Instructional Design Sprint (2012) - Peter Rawsthorne
http://criticaltechnology.blogspot.ca/2012/03/agile-instructional-design-sprint.html

Agile Instructional Design: A concept map (2012) - Peter Rawsthorne
http://criticaltechnology.blogspot.ca/2012/02/agile-instructional-design-concept-map.html

Agile Instructional Design: ENVISION (2012) - Peter Rawsthorne
http://criticaltechnology.blogspot.ca/2012/01/agile-instructional-design-envision.html

The Agile Learning Train is Leaving the Station (2012) - Jay Cross
http://www.jaycross.com/wp/2012/01/the-agile-learning-train-is-leaving-the-station/

The implementation of Agile Instructional Design (2012) - Peter Rawsthorne
http://criticaltechnology.blogspot.ca/2012/01/implementation-of-aid.html

Agile Instructional Design (2011) - Peter Rawsthorne
http://criticaltechnology.blogspot.ca/2011/11/agile-instructional-design.html

The Agile Model comes to Management, Learning, and Human Resources (2011) - Josh Bersin
http://www.bersin.com/blog/post/2011/09/The-Agile-Model-comes-to-Management2c-Learning2c-and-Human-Resources.aspx

Agility and Autonomy (2010) - Harold Jarche
http://www.jarche.com/2010/04/agility-and-autonomy/

The Agile Elearning Design Manual: Problems with existing approaches (2009) - Sumeet Moghe
http://www.learninggeneralist.com/2009/06/blog-post.html

Agile instructional design (2009) - Jay Cross
http://www.jaycross.com/wp/2009/02/agile-instructional-design/

Agile Instructional Design Team Structures (2009) - Manish Mohan
http://manishmo.blogspot.ca/2009/03/learn-and-lead.html

Instructional Design Needs More Agility (2007) - Harold Jarche
http://www.jarche.com/2007/10/instructional-design-needs-more-agility/

Agile Learner Design (2006) - Peter Rawsthorne
http://criticaltechnology.blogspot.ca/2006/01/agile-learner-design.html

Agile Instructional Design (2005) - Peter Rawsthorne
http://www.rawsthorne.org/bit/docs/RawsthorneAIDFinal.pdf

Thursday, March 15, 2012

Agile Instructional Design in Practice

A few weeks back I was engaged in an email conversation about Agile Instructional Design and where it fits with the institutional learner and the individual learner. I believe this was a very important conversation about my views on Agile Instructional Design. here is the Transcript;

Peter: Great to connect with you. I followed you on twitter and here is an email. Please reply to confirm receipt. Be Well...

Other: Thanks, Peter! I started looking for rapid or agile instructional development (ID), because we've got a lot of programs here that need to go online, and I'd like to find a methodology to assist with the development process. I'd also like to find a model of agile or rapid ID that would support leadership in understanding their sponsorship role. I've done these ID projects for over a decade, but usually have had the luxury of more resources. Times have changed and we've got limited resources and departments are likely to increasingly do things on their own, or even hiring 3rd party companies because they think we don't have the internal resources. It looks like you're focus is more toward exploring the personal side of ID. Is that what you're focusing on now with progressive video?

http://www.flickr.com/photos/helico/404640681/

Peter: It all sounds so familiar to me. A while back I was inspired by Rapid... but it still fell into the waterfall of ADDIE as far as I was concerned, so I started applying Agile techniques and so far they seem to be working on a number of projects. I have every intention of keeping my AID exploration as a methodology for larger institutions, medium sized communities of practice and the individual learner. I have a couple of sites (traditional institutions) where I am gathering further information of how they are applying Agile techniques to ID. I keep focused on the individual for it is where I believe all ID needs to come from. I honestly believe the best instructional designer is the learner themselves. And if we can build the learning into the actual course development this is optimal, saves money and deepens learning. Each round of the course just builds more content. One of the troubles I see when people go outside of the "institutions" Instructional Design Office is there are so many lost opportunities for reuse and the money spent when things aren't a shared service from a platform perspective... Anyhow, I hope I answered your question about my focus. I focus on the individual (myself being the example) for it is where all learning has to begin... but each individual becomes a part of the learning collective and should collaborate in building understanding by iteratively building and sharing learning resources with the guidance of teachers and instructional designers... That is kind of where I am going with AID.
Love to continue this discussion... I think I may turn this email into a blog post. It was a very important question. Thank-you! Be Well...


Other: What if your designing new programs. And it's only the exceptional learner who understands their own learning, right? It's rare to have students who've been taught about metacognition? For many students, control of their own learning is completely foreign and they've spent a lifetime having it stripped away from them.

Peter: Exactly!!!! that is why my blog has the theme, "Setting out to inspire adult learners. Pedagogy, technology and life-long learning from outside the institutions." and why I have the inspired learner series of posts;
I believe inspiring learners to claim back their own learning is one of the issues of our time... and the dialogue has only just begun.

What to do when the individual doesn't yet exist... set out to engage them during the first lesson or online module. Murder Madness and Mayhem is an excellent example. AID at its best! I spoke of it in this post; http://criticaltechnology.blogspot.com/2012/01/implementation-of-aid.html Look at what they did here http://en.wikipedia.org/wiki/Wikipedia:WikiProject_Murder_Madness_and_Mayhem In a way this is the easiest time for the ID or teacher for they just begin with the theme or outcomes of the course. It gets harder when there already is a body of content created by previous running's of the course. Introduce the topic, engage the learners, build the approach, a couple of rubrics, create some tension, inspire... what teachers should be doing anyway ;) This is an awesome conversation! Thank-you!

Thursday, March 08, 2012

An Agile Instructional Design Sprint

Scrum Sprint
Could a small group of subject matter experts, instructional designers, rich media experts and coders build a complete course in five days? This approach is gaining experience for the writing of books, why not courses. The approach would fit very well with the Agile Instructional Design approach and would take the best from the unconference, the book sprint and the scrum sprint. This is how I would envision the AID Sprint; I believe a sprint will occur within 5 to 10 working days.
  1. INVITE participants (be specific about subject domain)
  2. Finding the right group is about composing the right invitation. Be sure to be as specific as you can about the subject of the AID sprint. But leave it loose enough to encourage participation. The real focus will come out of the envision step. All the participants need to agree to meet in the same space for the duration of the sprint.

  3. ENVISION the curriculum
  4. Use brainstorming techniques, such as how stickies are used in an unconference. The point is to quickly create a shared vision of the module, course or curriculum - whichever fits best within the time available for the sprint.

  5. PLAN the modules
  6. Plan the modules, create storyboards, identify different opportunities for rich media, determine assessment techniques. Being thorough here is important for this is where you will identify the tasks and the content items that need to be built. Out of this smaller focused and nimble groups (one to three people) may form to develop different content items (ie. short videos, assessment instruments, diagrams, text, etc...)

  7. BUILD the content
  8. Start building the content. By this time the smaller focused groups would have formed to create individual items of content. It may be a good idea to have groups form around content types so they can focus and create all the identified pieces. The idea being, have one group focus on video resources, another on graphics, another on the text and organization, another on assessment. Once content starts to come together the sprint team should start to coalesce what they can. The iteration here will assist greatly in team energy and identifying what needs to be built and improved upon.

    Agile Instructional Design Sprint
  9. STABILIZE the technology
  10. This is where everything has to come together and the user testing begins. The unified build brings together all the individual content pieces and the course flow comes together with the assessment approaches. The stabilization also includes the technology stabilization and the first round of deployment to the production environment.

  11. DEPLOY the course or module
  12. Pushing work out to the web should occur as soon as a module is ready. Iteratively, pushing working modules out to your production internet environment creates success and attracts learners / testers / users. This is the only place you get real feedback, when you are live and on the internet. This feedback puts you on the road to continuous improvement.

  13. ITERATE
  14. Go back to the envision and planning steps, iterate and build more modules. Learn from the build, stabilize and deploy steps just completed and add further learning modules. Work towards completion of complete curriculum.

Next Steps: 
The next steps in proving the AID Sprint are twofold;
  1. To build a learning module focused on Agile Instructional Design with me occupying all roles. This will allow me to work out the bugs in the sprint methodology and to learn the technology for implementation. 
  2. Send out an invite toward one of the curriculum areas I have identified in legal education for the adult public.

Tuesday, March 06, 2012

Dear Team Mozilla

With great excitement I apply for the position of “Curriculum and Community Systems Designer”. I have many years working in Curriculum and Community design and deeply enjoy extending existing curriculum and building new curriculum from the ground up. I love to help people learn new things, especially in the technology realm. I have contributed to the building of OER and related communities for the past five years and focused my graduate studies within this capacity. My foundational work with WikiEducator provided me opportunities to learn a great deal about collaboratively building international communities and curriculum and in being a primary contributor to this very successful online higher education learning community.

I also possess many years working in software and web development where I have managed many projects and have been successful in many roles including analysis, design and requirements gathering. I have a proven history of community stewardship and in gathering community needs to grow and improve the community. I have built many web properties in many different capacities from small start-ups, municipal engagements, provincial learning communities and global OER initiatives.

I am well prepared to evangelize curriculum and badges technologies as, in the past, I have participated in many conferences as both an attendee and a speaker. I look forward to meeting other people with similar interests and to work collaboratively with conference attendees in improving upon shared visions.

I actively blog, tweet, tag and collaborate in social media. I actively contribute to wikiversity and am currently building curriculum around mobile application development and emerging pedagogical approaches. I have designed and taught many courses both on college campuses and online. Within my recent experiences I have focused my teaching skills on online and blended approaches. I continue to encourage people to be life-long learners.

My career has followed two parallel paths; one in education, teaching and building educational communities and learning technologies. The other as a project manager, solutions architect, database administrator and software developer. I actively seek opportunities that blend the two. Applying for this position is the most excited I have ever been in making an application. I believe it brings together both my areas of competency extremely well. The best way to get a sense of my experience is to review a number of my professional and personal artefacts;
Sincerely,
Peter Rawsthorne
peter@rawsthorne.org

Sunday, March 04, 2012

tighten up lists for mobile

I was playing around with bullet and numbered lists for my mobile first web sites today. And when you are pushing content to mobile devices becoming more aware of how you use white space becomes important. The ability to change margins and padding with ordered and unordered lists can reduce white space. using the following CSS to format you lists can considerably tighten up the lists for mobile.

ol, ul {
 margin-top: 2px;
 margin-left: 12px;
 padding-left: 5px;
}

A web page presented with no CSS formatting for lists.


A web page presented with CSS formatting specifically displaying lists on a mobile device. Note how the list is further to the left and has less padding. The page displays with more content to white space. Great for mobile.