Reflective Activity: If the server infrastructure for the issuer is mostly about storing and managing earner, evidence, criteria and badge information, what information needs to be stored and managed by the displayer? Compare and contrast the server infrastructure needs of the issuer and the displayer.
Thursday, July 12, 2012
Open Badges Step 2.3: Technical Prerequisites - Server Infrastructure
The last of three screencasts on the technical prerequisites for integrating with the Open Badges Infrastructure. In this screen cast I discuss the server infrastructure required for each of the three roles of; issuer, earner, and displayer. I mostly spend my time describing the server needs of the issuer, where the displayer is quite similar to the issuer, especially if it becomes a fat displayer. And by fat I mean it offers a lot of displayer services related to badges and their earners. Again, the earner requires the least infrastructure, but can require more if we begin down the road of federated backpacks. More on the federated backpack in a later screencast.This screencast is a part of a step-by-step guide built to support the onboarding of the non-technical OBI implementer.
Reflective Activity: If the server infrastructure for the issuer is mostly about storing and managing earner, evidence, criteria and badge information, what information needs to be stored and managed by the displayer? Compare and contrast the server infrastructure needs of the issuer and the displayer.
Reflective Activity: If the server infrastructure for the issuer is mostly about storing and managing earner, evidence, criteria and badge information, what information needs to be stored and managed by the displayer? Compare and contrast the server infrastructure needs of the issuer and the displayer.
Open Badges Step 2.2: Technical Prerequisites - Technology Stack(s)
The second of three screencasts on the technical prerequisites for integrating with the Open Badges Infrastructure. In this screen cast I discuss the technology stack(s) required for each of the three roles of; issuer, earner, and displayer. This discussion is more of a logical view of the technologies you need. The idea being we are building on ideas from the non-technical perspective. Getting deeper into the technology will come in later screencasts.This screencast is a part of a step-by-step guide built to support the onboarding of the non-technical OBI implementer.
Reflective Activity: Why does the issuer require the most technology? Can the earner get away with having no technology beyond internet access and a facebook account? Can you think of a reason why a displayer would require more technology than the issuer?
Reflective Activity: Why does the issuer require the most technology? Can the earner get away with having no technology beyond internet access and a facebook account? Can you think of a reason why a displayer would require more technology than the issuer?
Wednesday, July 11, 2012
Open Badges Step 2.1: Technical Prerequisites - JavaScript
The first of three screencasts on the technical prerequisites for integrating with the Open Badges Infrastructure. In this screen cast I discuss the basic javascript you need to know to manually issue badges. I also touch upon the prerequisites if you move beyond manually issuing badges and integrate with an LMS or other server application. This screencast is a part of a step-by-step guide built to support the onboarding of the non-technical OBI implementer.
Reflective Activity: If you are going to integrate badge issuing with your learning management system (LMS) or other server application, do you need more than just JavaScript?
Reflective Activity: If you are going to integrate badge issuing with your learning management system (LMS) or other server application, do you need more than just JavaScript?
Tuesday, July 10, 2012
WebGL Interview 2
My learning in the open journey in building learning resources for the Mozilla Ignite initiative continues. 8 days back I had the amazing opportunity to speak with Mozillians Benoit Jacob, Ben Moskowitz and Bobby Richter, the conversation created the following pocast. This podcast was a discussion about some of the ideas forming from the Ignite challenge and we discussed what would be required to implement these ideas using WebGL within the superfast-superwide GENI network. The purpose of this podcast was to further identifying technologies and approaches so we can create focused learning labs, and set up experiments that others can follow and use as learning resources.
WebGL Interview 1
My learning in the open journey in building learning resources for the Mozilla Ignite initiative continues. 10 days back I had the amazing opportunity to speak with Mozillians Ben Moskowitz and Bobby Richter, the conversation created the following pocast. This podcast was a blue-sky discussion about using WebGL within the superfast-superwide GENI network. The purpose of this podcast was to start identifying technologies and approaches so we can create focused learning labs, and set up experiments that others can follow and use as learning resources.
Monday, July 09, 2012
Open Badges Step 1: Claim your first badge
In this screencast I look at some of the technical resources available for introducing someone to the open badges infrastructure (OBI). The screencast is a part of the Introduction to Open Badges Step by Step guide. The main theme of this screencast is to claim a couple of badges and to look at a number of badge issuers.
Reflective Activity: Once you have earned, claimed and displayed a few badges take some time to reflect upon the three main roles of open badges; the issuer, the earner and the displayer.
Reflective Activity: Once you have earned, claimed and displayed a few badges take some time to reflect upon the three main roles of open badges; the issuer, the earner and the displayer.
Saturday, July 07, 2012
Open Badges Step 0.4: P2Pu Open badges 101
In this screencast I look at Peer 2 Peer Universities Open badges 101 course. The screencast is a part of the Introduction to Open Badges Step by Step guide. The main theme of this screencast is to encourage people to familiarize themselves with and complete the course.
Reflective Activity: How could Peer 2 Peer University issue badges. Should they give badges for completing individual challenges or for complete courses? What other badges within peer based learning could P2Pu issue?
Reflective Activity: How could Peer 2 Peer University issue badges. Should they give badges for completing individual challenges or for complete courses? What other badges within peer based learning could P2Pu issue?
Friday, July 06, 2012
The followers have spoken
Well it looks like my poll asking for assistance on which half-finished blog post I should complete next has provided me adequate results. Other than the injection of posts regarding open badges and ignite learning labs I will spend my next while completing the following posts, in this order;
- Traditionalists, Reformers and Outliers - 54% voters
- Computer Science taught as an Art - 45% voters
- Digital Me (Mozilla + Life-Long Learning) - 36% voters
- Using smart phones within a connectivist approach - 36% voters
Thursday, July 05, 2012
Help me complete my half-finished blog posts
After reading a couple of posts on Boris Mann's blog, in particular; "The Posts That You Don't Write". I got thinking about all the half written blog posts I have. My blogging style is to write down ideas for blog posts as unpublished blog posts. As the ideas pop into my head I create the post, add notes and references, loop around, and often finish them off. This can take months, sometimes over a year... most of the time they get finished (or deleted). Currently, I have over 20 blog posts like this, some are almost finished some are not. So I wondered, what would happen if I put this out to vote.
Which of these half-finished blog posts should I complete?
Which of these half-finished blog posts should I complete?
Friday, June 29, 2012
The WebGL ecosystem
After a couple of recent discussions and some further reading; two diagrams have provided some great insight into WebGL as it relates to the web and other related technologies... These two digrams and related posts are as follows;
 |
| http://electronicdesign.com/article/embedded/html5-and-webgl-fit-interactive-embedded-applications |
 |
| http://phillihp.com/2011/01/27/waiting-on-webgl-html5/ |
Mozilla Ignite + WebGL: Introduction
A concept map can go a long way toward developing an understanding of any subject domain. This simple concept map is my first stab at WebGL and will be added to as I deepen my understanding.
 |
| An introductory concept map for WebGL. What is WebGL? |
To start learning about WebGL there are many resources and tutorials to assist with learning. These resources can be found with internet searches and will take you to many step-by-step guides and youtube videos. I strongly suggest you spend time searching for, and completing WebGL tutorials if you are wanting to deepen your understanding of the coding to WebGL. An excellent YouTube video that covered an introduction to WebGL with a whole lot of coding examples is from Erik Möller...
Tuesday, June 26, 2012
Learning in the Open
 |
| Learning in the open; Koh Lanta, Thailand. |
One area of learning and OER development I am currently involved is with the Mozilla Ignite Challenge. With this project I leverage my 25 years in technology and software architecture, combined it with my teaching, instructional design, and open education experience and create some OER to assist Mozilla Ignite candidates learn about some of the technologies available in (and supported by) this challenge.
What is Learning in the Open?
Learning in the open is based on four principles and one model;
 |
| Progressive Inquiry |
- the principle of open learning - the learner is self-directed, independent, and self-guided.
- the principle of metacognition - the learner is aware of their own learning style, and how to best develop their own skills and knowledge.
- the principle of open - where everything they do while learning is done in the open, with transparency, reflection and frequent publishing of their knowledge gathering.
- the principle of collaboration - engage your peers and learning cohort with frequency and without hesitancy.
- progressive inquiry - provides the discipline and model to follow when working towards discovery and understanding.
How does this apply to the Mozilla Ignite Challenge?
By learning in the open, engaging others in my learning and publishing the artifacts of my leaning, I create a road-map for others to follow who want to learn the same. Over the next five weeks I will gather information in a variety of ways, publish frequently and coalesce the information into a single rich media artifact for peoples learning consumption. I will start with WebGL and finish with WebRTC. Feel free to follow along;
Saturday, June 23, 2012
Open Badges Step 0.3: A first look at open badges JSON
In this screencast I take a first look at the json message for issuing a badge. Given the open badges dependency on messaging this is the first look at the messages required to implement open badges. Keep in mind that as the OBI matures and the partner network increases, there will be a growing number of software applications that will implement this messaging. In the near future the technical understanding of the messaging will be the domain of the software developers. Understanding the messaging and its attributes will assist greatly in your open badges implementations. This screencast is a
part of the Introduction to Open Badges Step by Step guide. The main theme of this screencast is a review of three blog posts which look into manually issuing a badge;
Reflective activity: Think about how you would create the criteria for a badge, and how someone would provide evidence to be awarded the badge.
- a technical look at some existing learning resources
- an investigation into the criteria and evidence attributes
- a completed manual badge implementation
Friday, June 22, 2012
Open Badges Step 0.2: Do a whole lot more reading
In this screencast I look at some of the technical resources available for introducing
someone to the open badges infrastructure (OBI). The screencast is a
part of the Introduction to Open Badges Step by Step guide. The main theme of this screencast is a review of my technical look at the available resources.
Reflective Activity: take some time to read all of the above sites referred to in this screencasts related post and answer the question, "Which FAQ would you read to answer technical questions and which would a read for more general questions? Where could you access the source code for the open badges project?".
Reflective Activity: take some time to read all of the above sites referred to in this screencasts related post and answer the question, "Which FAQ would you read to answer technical questions and which would a read for more general questions? Where could you access the source code for the open badges project?".
Thursday, June 21, 2012
Open Badges Step 0.1: Do a whole lot of reading
In this screencast I look at the resources available for introducing someone to the open badges infrastructure (OBI). The screencast is a part of the Introduction to Open Badges Step by Step guide. The main theme of this screencast is a review of the post by Sunny Lee of the Open Badges team.
Reflective Activity: take some time to read all of the above sites referred to in this screencasts related post and answer the question, "How are the roles of Issuer, Earner and Displayer related, how are they dependent upon each other, and what role do they each play within the Open Badges Infrastructure?".
Reflective Activity: take some time to read all of the above sites referred to in this screencasts related post and answer the question, "How are the roles of Issuer, Earner and Displayer related, how are they dependent upon each other, and what role do they each play within the Open Badges Infrastructure?".
Wednesday, June 20, 2012
Screencasting guildelines

When I combine my belief in screencasting with my experience in creating Open Educational Resources (OER) I look to a larger picture where the preparation and artifacts created in the lead up to recording a screencast are also important artifacts for learning and reuse. And when you also consider the reuse possibilities and the localization needs that may occur, creating treatments for the screencasts and storing the raw multimedia files also become important.
For my current project work with Mozilla I have decided to create an Open Resources Wiki within the larger Mozilla Wiki. This open resources wiki will store guidelines, resources and artifacts for creating open resources. I believe these resources could be very useful as Mozilla deepens its commitment to digital literacy and webmaking. I believe that the resources I create will have the ability to be reused and localized and I need to be mindful of this possibility as I create new learning resources.

Preparing multimedia resources of reuse and localization takes additional work, but it is work that makes a better initial product. This occurs because greater thought needs to go into the resource before it is created. My recent set of screencasts have focused on the onboarding of open badges implementers where I have created screencast treatments and stored the related media in RAW format encouraging reuse and easing localization efforts.
- The step by step guide I am creating resources; https://wiki.mozilla.org/Badges/StepxStep
- The scaffolding and treatment guidelines for screancasts; https://wiki.mozilla.org/User:Prawsthorne/Scaffolding/Webinars
- The actual treatment for step 0 of the resource; https://wiki.mozilla.org/Education/OpenResources/Badges/0-Reading
Tuesday, June 19, 2012
Open Badges Step by Step Screencasts
I'm developing a set of screen casts that are going to be a companion to the step by step guide I am putting together on the Mozilla wiki. And once the full set is done, they can be reused for developing other Open Badges educational resources. What I'm really wanting to do is develop an Open Badges 102 as a follow-up to the 101 course found on the P2Pu.
After I put this screencast together, I reflected upon it and received some feedback from the open badges team I'm going to make the following changes;
After I put this screencast together, I reflected upon it and received some feedback from the open badges team I'm going to make the following changes;
- keep each screencast to around 5 minutes or less.
- keep the content down to a few main topics
- don't jump into anything technical to quickly
- end most of them with a reflective activity to have the learner reflect and do some "homework".
Monday, June 18, 2012
Youth Informal
I get flipped out by the idea that there is so much interest in the Youth Informal partner type for the open badges issuer. Having alternative ways to recognize skills, knowledge and accomplishment is a big part of open badges and having partners focused on this youth group is a great thing.

If you want more information about partnership engagement for open badges, go to this excellent post put together by Sunny Lee of the Open Badges team.
If you want more information about partnership engagement for open badges, go to this excellent post put together by Sunny Lee of the Open Badges team.
Sunday, June 17, 2012
Ignite Learning labs
I need to start investigating a number of technologies for the Mozilla Ignite challenge... the eight technologies I will be looking at include;
- WebGL - Graphics Library
- WebRTC - Real-Time Communications
- OpenFlow - deploy innovative protocols
- Eucalptyus VM - Infrastructure as a Service
- Web Audio API - processing and synthesizing audio
- WebCL - Heterogeneous parallel computing
- Node.js / Websockets
- Appcache and WebAPIs
I'm going to start with these above two technologies and move into these final six if the first two investigations prove successful. Success will be measured through the creation of learning resources to assist ignite candidates.
- WebGL tags - http://www.delicious.com/prawstho/webgl
- WebRTC tags - http://www.delicious.com/prawstho/webrtc
Friday, June 08, 2012
Open Badges for a Wikiversity course

The course
The course is Mobile Web Applications. I have been slowly developing this course to provide an Open Educational Resource (OER) for implementing HTML5 mobile applications within an Model View Controller (MVC) pattern. And how the MVC pattern fits within a multi-tier architecture. The course was inspired by two of my most viewed blog posts from last year (these two posts have attracted thousands of views over the the last nine months);
The course is far from finished, and whenever I have a few spare cycles I try to add to the course. My latest effort toward this course was to implement open badges for completing the quizzes and projects from within each chapter.
The badges

The courses badge taxonomy became a part of the course wiki; http://en.wikiversity.org/wiki/MWA/Badges
The criteria
For each chapter will be added a criteria page and this page will point to both the projects and quizzes. The quiz results are not saved as they are widgets built from wikiversity templates. The quizzes are mostly to test your understanding and prompt you to review the modules contents. A little reflection to deepen learning. The projects become the key part of the criteria. With the projects you need to build working software, and it is this working software that will become the evidence to be evaluated against the criteria.
The evidence
To be awarded the badge you need to complete all the projects for the chapter. As the course is about building mobile web applications, the evidence is a working mobile web application. Once all the criteria has been met the learner will create an evidence URL for review to be awarded the badge. The evidence I provided for the course can be found at; http://books.bit.bc.ca/ which implements all the requirements requested in the chapter projects. Try viewing the evidence in a browser and on your mobile device.
The 1st json file
There are two ways to prepare a json file for submission to you digital backpack. The first way is to use the URL approach to baking a badge. This is best described in a blog post by Billy Meinke. This blog post walks you through the process of hand baking a badge. The difference between the two methods is the first, described here, requires no coding or javascript, it just requires the correct creation of the json file and submitting it to be baked through well formed URL.
The 2nd json file
The second approach is by hashing the recipient attribute, inserting it into the json file and submitting the file by using the correct JavaScript call. The recipient attribute is hashed using a one way hash with a select number of hashing algorithms, in this case sha256. The recipient attribute will look something like the following;
sha256$b42062d4b8b9b45560d202243720e7f94f139ce0c7363fa4171daf1f6fcaaef5
The Code
The below block of code does two things; first it shows the line of php code that creates the hash for the recipient and second, it shows the javascript to load the json into the backpack. The php serves as an example of how to create a hashed recipient and the javascript works at submitting the json to the OBI.
Please Note that the hashing line does not automatically insert the hashed string into the json file. That needs to be done by hand. This block of code is for example purposes only.
<html>
<body>
<?php
echo hash("sha256", "peter@rawsthorne.org"."mwach01");
?>
<br/>
Peter Rawsthorne <a href="javascript:OpenBadges.issue(['http://badges.bit.bc.ca/mwa/mwa-pjrch01.json'], function(errors, successes) {  });">, claim your badge.</a></p>
<p><script src="http://beta.openbadges.org/issuer.js"></script></p>
</body>
</html>
The PhP
hash("sha256", "peter@rawsthorne.org"."mwach01");
This line of php code simply hashes the earners email address with the seed value using the sha256 hash algorithm. This code creates a string of text that should be embedded in the json file to be submitted to the OBI.
The JavaScript
The javascript has two main parts; referencing the script library and calling the issuer of the badges software module.
this line includes the open badges issuer javascript library.
<script src="http://beta.openbadges.org/issuer.js"></script>
this line sets up the call to submit the json file.
Peter Rawsthorne
<a href="javascript:OpenBadges.issue(['http://badges.bit.bc.ca/mwa/mwa-pjrch01.json'], function(errors, successes)
 {  });">, claim your badge.</a></p>
The json file
Follow this link if you want to look at the json file, as required for the 2nd approach, that would be submitted to the OBI; http://badges.bit.bc.ca/mwa/mwa-pjrch01.json
The Success
After using either of these two methods for submitting the correctly formatted json file, a new badge will be in the backpack.

Wikiversity as an Issuer
Wikiversity and Wikipedia are already (in a way) badge issuers, they call their badges "Userboxes". They have many Userboxes that can be put on a contributors profile.It would be great if these could become a part of a persons digital backpack.
Thursday, June 07, 2012
Three point lighting for video capture
I have the need to capture the talking heads in a video conference session. I need to capture each talking heads video stream and save it to disk. I need each stream captured and saved so it can be archived for later viewing, and the ability to slice up the video into smaller segments. The video will be taken from interviews using online video conferencing software. The challenge comes where the video conferencing software doesn't allow capture of individual streams, in general they just make the whole conference (with all talking heads) available as a single video. And because we need to have solid recording of each talking head for later use in a variety of online learning situations we need a remedy for this situation. Keep in mind, that in general, the video conferences will be with two or three people all in different geographic locations. The solution is to use the video conferencing software as we would normally with two adjustments to the environment;
- Create a good studio environment from a lighting perspective.
- Include a separate video camera to the mix. Or replace the interviewer with the laptop hosting the video conference.
There is no shortage of good images and video on how to set up a three point lighting system. these two below are a couple of my favorites. Keep in mind the interviewer is going to be replaced by the laptop hosting the video conference.

This is where things vary most from the traditional interview setup. The interviewer is replaced by the laptop hosting the video conference. This will allow you to capture the video in a good quality with good sound. And it will provide it in a format that will allow you to separate the audio from the video and slice up the video so it can be re-used in different learning contexts and situations. Essentially providing a long tail to your video resources.
Sunday, June 03, 2012
Open Badges Evidence

David Wiley put together the open badges displayer hack so his students could generate the code required to display their badges at any location they could host JavaScript or HTML. This hack was important to support the badges the course had issued to the students. What is also interesting is the varied approaches behind the criteria and evidence of the badges for this course. When you look into the different json for each badge with particular focus on the criteria and evidence attributes you get to see the varied capabilities of issuing badges. To get started I'd suggest you review the following sites looking at some particular attributes;
- The introduction to openness in education course site provides a good look at the breadth of topics within openness in education. In particular, look at the right column list of topics. Spend some time reading all the tabs that make up the course. Look at the flexibility David Wiley has created in how to earn a badge. When you look at the badges issued, you see he also created ways for students to define their own criteria and then provide evidence.
- The badges earned page prompts the students to claim their badges, and taking a look at each students json file gives great insight into how assessment and badge awarding can be achieved within an academic environment.
- I opened up the json file for Wendy Woodfield and the awarding of the "OpenEd Overview" badge.The json file had the following criteria and evidence attributes; as you can see these two attributes resolve to URLs, and when you follow these you get the descriptions of what is required to be awarded the badge (criteria) and what Wendy created and accomplished to meet the criteria (evidence).
- criteria: http://www.kipsum.com/blog/2012/03/15/open-visualization-ninja-programmer-badge/
- evidence: http://www.kipsum.com/blog/2012/04/04/data-visualization/
{
  "recipient": "sha256$a782df7378fc6a5190b3b25dd7834ce8e0c192055595bc4ae7e79dc10831ad44",
 "salt": "#ioe12",
  "evidence": "http://www.kipsum.com/blog/2012/04/04/data-visualization/",
  "issued_on": "2012-04-11",
  "badge": {
    "version": "1.0.0",
    "name": "OpenEd Visualization Ninja Programmer",
    "image": "http://openeducation.us/issuer/img/badge-assessment.png",
    "description": "Has designed a badge-based assessment for the Introduction to Open Education course.",
    "criteria": "http://www.kipsum.com/blog/2012/03/15/open-visualization-ninja-programmer-badge/",
    "issuer": {
      "origin": "http://openeducation.us/",
      "name": "David Wiley",
      "org": "Introduction to Open Education, 2012",
      "contact": "david.wiley@gmail.com"
   }
  }
}
To further explore the approach of issuing badges and how it can be done within peer based learning environments it is very useful to view the work of Alex Halavais. In particular, the slides from the slideshare below at around the 14 minute mark speak to the approaches for peer assessment within an online course.
In my mind, this means it is completely legitimate that you could issue yourself your own badges. And you would be the one who sets and enforces the quality and rigor required to earn your badge. If people come across your badge, and believe it is worthy, they could follow the same learning journey defined in the criteria and evidence and attempt acquiring the badge themselves. The subject of issuing your own badges requires further unpacking... but combined with peer-assessment from your personal learning network could provide a vehicle for self-directed life-long learners to publish their accomplishments in a way people could follow and even replicate.
Friday, May 25, 2012
Open Education Conference 2012
Part of my learning journey in developing Agile Learner Design (ALD) is to engage others in my personal learning network. What a better way than to present at the Open Education Conference. I'd be flattered if I ended up being selected... but the attempt will only deepen my understanding and development of this much needed pedagogical approach.
Here are the details of my call for papers application:
Session Title:
Agile Learner Design
Short Abstract:
A pedagogical approach for the self-directed life-long learner to envision, plan, build and deploy their own curriculum.
Medium Length Description:
The people who build Open Educational Resources are also the people who create, and further develop, an expertise in the OERs subject domain. Agile Learner Design (ALD) leverages the idea that the instructional designers are often the ones who learn most from developing curriculum, not the students who consume it. At a time when self-directed life-long learning is becoming a recognized approach to personal learning and growth we require pedagogical approaches that develop the learners meta-cognitive abilities and provide a roadmap for these self-directed learners to develop and execute upon their own curriculum. ALD provides the pedagogical approaches to support self-directed life-long learners achieve their personal learning goals outside of (and within) the traditional institutions. This presentation will explore the breadth and depth of ALD as it has developed over the last seven years.
Conference Theme:
Open Educational Resources
Session Type:
45 minute presentation
Martial Arts Badge Systems Design
 |
| Jiu Jitsu Belt Ranking System |
I also like how the colors can be expanded by adding attributes to the belt (like dark lines or white cuffs). This allows for a level of understanding, denoted by a single color, to be expanded to contain additional levels within the same color. This could allow for badges to be offered at different levels of granularity depending on the group, the learning goals, the duration, the context, etc. In some of the martial arts practices they have many top levels (or degrees), creating a flexibility for life-long learning.
From a technical perspective the colors found in the martial arts belts are all web safe colors. So when creating and displaying badges the challenges in rendering will be reduced by the smaller and known color palette. I am also a strong believer in having iconic or color themes throughout course materials that provide a visual prompt of where the learner is within their learning journey. Having this prompt aligning the learning resources with the awarded badge can assist in organizing learning modules throughout a program or learning journey. And again by using web safe colors across all modules, and out to the mobile devices they will be utilized, can assist in keeping the learner organized and knowing the materials they are focused upon are at the correct level for their abilities and knowledge.
| cccccc | white | None |
| ffff66 | yellow | Introduction |
| ff6633 | orange | Beginner |
| 339966 | green | Intermediate |
| 0066ff | blue | Advanced |
| ff00ff | purple | Expert |
| 990000 | brown | |
| 000000 | black | Master |
| ff0000 | red |
Described here are my musings about badge color schemes. They may not work for your learning context or how many levels or goals your learning system has. There are many things to consider when designing badge systems. And having a varied color system that provides many levels that can be easily added too many not be the best. For further perspectives on badge systems design I strongly recommend reading Erin Knight's (Senior Director of Learning with Mozilla Foundation) excellent post discussing the three T's of badge systems design.
Thursday, May 24, 2012
Making a badge

Create a badge with Gimp
Semi-circular text with Gimp
Even though it is fairly easy to create your own badges, it is a really good idea to engage a proven designer. With the emerging badge economy and the benefits to promote your brand (institutional or otherwise) that will be available through badges, the designer could be of great benefit.
Wednesday, May 23, 2012
Carla Casilli's excellent troika of posts
This troika of posts from Carla Casilli is a must read for everyone wrapping the heads around designing open badge systems. I know these three posts have given me more license to dive more deeply into approaches for digital badges. particularly how they apply to the self-directed life-long learner. Thank-you Carla!!!
- Addressing questions of validity and introducing reliability + credibility into the equation
https://carlacasilli.wordpress.com/2012/05/21/badge-system-design-what-we-talk-about-when-we-talk-about-validity/
I completely resonate with this post and how it challenges the status-quo regarding validity of credentials and how validity is built through time. Most things that have credibility, built their credibility through time.
- Different perspectives on ways to approach badge system design
https://carlacasilli.wordpress.com/2012/05/20/badge-system-design-seven-ways-of-looking-at-a-badge-system/
Looking at badge systems from many views is key to understanding badges systems. Badges are a paradigm shift, a disrupter, an opportunity for every self-directed life-long learner.
- Why open badges matter in a binary world https://carlacasilli.wordpress.com/2012/05/18/badge-system-design-beyond-a-binary-approval-system/
This post does a great job of getting you thinking about traditional accreditation systems. Learning is a life-long journey and doesn't have an end point. Even upon mastery of a subject domain, you realize there is still so much to learn. Badge systems can do a great job is supporting the endless journey of learning.
Tuesday, May 22, 2012
A badge taxonomy
I'm now to the point where I need to create sample code for the badges step-by-step. For my testing and sample code there is a minimum of items I need to begin, these are;
How do I decide on the badge taxonomy?
The new challenge is in creating a badge taxonomy that will work for my learning context and how the learning progress will advance. It does seem like I'm making the creation of some sample code way to complicated, but I want the sample to provide enough complexity to make it real.

Now I have started thinking about it, it becomes complicated, the devil really is in the details. I want a taxonomy that provides enough levels so I can differentiate between the different levels of competency, I also want to show beginning and completion. I want things to be visually appealing and easily understood. When I step outside of scout / merit badges, I begin to think more about the different levels of competency or mastery. The two that jump to mind are what is available with the martial arts with belts and those available with bronze, silver and gold awards.
 The martial arts taxonomy
What I really like about the martial arts taxonomy is the range of colors, the differentiation between child and adult, the shared starting point of white, and the flexibility to the number of levels. What concerns me most in using the martial arts levels is there are too many levels. and trying to spread a curriculum across so many levels would create an unnecessary complexity in getting to completion.
 Gold, Silver and Bronze taxonomy
What I like about the Olympic style awards is its simplicity. And how it has been well applied to many award systems. I remember growing up in Canada we had a gold, silver and bronze fitness badges. The amount of excitement around these badges was outstanding. And having only three levels made things simple and provided for three different levels of achievement. What concerns me most about these three awards is their relationship with competitive activities and having a 1st, 2nd and 3rd place finish. In my mind, learning isn't about competition, it's about achievement and depth of knowing. I also don't believe the gold, silver and bronze provide enough variety of colors to make the badges distinguishable.
My badge taxonomy
I often find the simple solution is often the best solution. I like the use of colors as found in the martial arts approach, I believe a good use of colors will also work best on the web. I also like starting with white as the introductory level. I like having only a few levels of achievement (three or four) for this fits well within; beginner, intermediate, advanced and master.

The taxonomy I have developed here only serves as an example of the things I have thought about and what I believe is important. I would think that their already exists many attributes within your institution, organization and approaches that should be considered when developing a badge system taxonomy. I hope this post has got you thinking about how you would create your badge system.
- some graphics files for each of the badges I'd like to issue
- a web location describing the criteria
- a web location providing evidence of completion
How do I decide on the badge taxonomy?
The new challenge is in creating a badge taxonomy that will work for my learning context and how the learning progress will advance. It does seem like I'm making the creation of some sample code way to complicated, but I want the sample to provide enough complexity to make it real.

Now I have started thinking about it, it becomes complicated, the devil really is in the details. I want a taxonomy that provides enough levels so I can differentiate between the different levels of competency, I also want to show beginning and completion. I want things to be visually appealing and easily understood. When I step outside of scout / merit badges, I begin to think more about the different levels of competency or mastery. The two that jump to mind are what is available with the martial arts with belts and those available with bronze, silver and gold awards.

What I really like about the martial arts taxonomy is the range of colors, the differentiation between child and adult, the shared starting point of white, and the flexibility to the number of levels. What concerns me most in using the martial arts levels is there are too many levels. and trying to spread a curriculum across so many levels would create an unnecessary complexity in getting to completion.

What I like about the Olympic style awards is its simplicity. And how it has been well applied to many award systems. I remember growing up in Canada we had a gold, silver and bronze fitness badges. The amount of excitement around these badges was outstanding. And having only three levels made things simple and provided for three different levels of achievement. What concerns me most about these three awards is their relationship with competitive activities and having a 1st, 2nd and 3rd place finish. In my mind, learning isn't about competition, it's about achievement and depth of knowing. I also don't believe the gold, silver and bronze provide enough variety of colors to make the badges distinguishable.
My badge taxonomy
I often find the simple solution is often the best solution. I like the use of colors as found in the martial arts approach, I believe a good use of colors will also work best on the web. I also like starting with white as the introductory level. I like having only a few levels of achievement (three or four) for this fits well within; beginner, intermediate, advanced and master.

The taxonomy I have developed here only serves as an example of the things I have thought about and what I believe is important. I would think that their already exists many attributes within your institution, organization and approaches that should be considered when developing a badge system taxonomy. I hope this post has got you thinking about how you would create your badge system.
Friday, May 18, 2012
Open Badges: Step-by-Step
Over the last few weeks I have had the pleasure and opportunity to speak to a number of people regarding how best to onboard people to implementing the Open Badges Infrastructure (OBI). The participants of these conversations have been both Mozillians deeply involved in the project and potential partners who want to implement the OBI as a part of their project. I believe the most significant understanding from all these conversations, combined with my reading and research, is that a gap exists between wanting to implement and being able to implement. The Mozilla team in and around open badges has done a good job of putting together resources that cover the subject of how to implement. These resources can be found in four primary places;
In one particular conversation with Sunny (Product/Partner Manager, Open Badges) we talked about how best to close the gap for those who want to implement, yet are struggling to get over the first few steps of how to implement the OBI. There has already been a few people or groups who, with relative ease, have successfully navigated the documentation and source code to implemented both an issuer and displayer for badges. My investigations into why some people people have implemented with ease and others struggle is due to having specific technical understandings. The skills and knowledge required are an intermediate understanding of JavaScript, JSON and web development combined with a conceptual understanding of the roles (earner, issuer and displayer) within the OBI.
What I really like about all this recent activity is it fits very well with where I am at in designing the OER for the OBI. I've finished the envisioning step and have moved into the planning step. And having had these conversations with a few partners and some Mozillians I have had a good amount of user and stakeholder engagement to focus my planning and design for the OER. This planning and design will focus on building educational modules to close this identified gap and engage others to support the building and testing of these modules. And to me (and I think others) the place to deploy these learning modules will be p2pu.
The proposed first steps will be (comments and feedback would be most appreciated);
In one particular conversation with Sunny (Product/Partner Manager, Open Badges) we talked about how best to close the gap for those who want to implement, yet are struggling to get over the first few steps of how to implement the OBI. There has already been a few people or groups who, with relative ease, have successfully navigated the documentation and source code to implemented both an issuer and displayer for badges. My investigations into why some people people have implemented with ease and others struggle is due to having specific technical understandings. The skills and knowledge required are an intermediate understanding of JavaScript, JSON and web development combined with a conceptual understanding of the roles (earner, issuer and displayer) within the OBI.
 |
| Steps to Wat San Goo, Mae Rim, Thailand. |
The proposed first steps will be (comments and feedback would be most appreciated);
- Step 1: Claiming a badge
Create a hands-on familiarity with badges by earning a badge. - Step 2: Technical Prerequisites
Build a basic understanding of the technology behind open badges - Step 3: Creating your site
Fulfill the minimum requirements of the technology needed to host the ability to issue a badge - Step 4: Issuing a badge
Implement the technologies in your hosting environment to issue a badge - Step 5: Earning a badge
encourage learners to claim their issued badge and store it in the backpack - Step 6: Managing your badges
how to manage the badges in the backpack and make them available for display - Step 7: Displaying your badges
Put together the code to display your badges
Wednesday, May 16, 2012
Open Badges: What I've learned so far
Over the last couple of weeks I've begun to immerse myself in the Open Badges Infrastructure (OBI) with two main goals;
 My immersion has created a number of enjoyable explorations and I believe it is this broadness to my learning that has given me the most value. I have explored every path that I have discovered, and collectively they have allowed me to understand both the technical implementation and the rationale behind the OBI. The paths and lessons are as follows;
- Have the technical understanding to support the developer community who want to implement the OBI from the issuer, displayer and earner perspectives.
- To develop a complete curriculum [as an Open Educational Resources (OER)] around how to implement the OBI.

- open badges site - the openbadges.org site provides a great introduction to all the main concepts of open badges. It also serves as a launching pad, via the assorted embedded links, to deeper learnings across all subjects.
- open badges wiki - the open badges wiki provides all the information the site has with much more detail and additional links and documents. Particularly important with the open badges wiki is the get involved section that provides all the references someone would need to engage with the community. Also, it is a wiki so feel free to contribute or start building pages under your profile.
- community calls - if you can find an hour starting at 9 am PST on Wednesday, it is well worth your time to engage in a open badges community call. Also, a really good example of how distributed teams can work well together.
- open badges google group - when the time comes venture into the google group, you will be glad you did, there is great depth to the discussion threads. The discussions vary from the technical details of how to implement the OBI, through the importance of evidence, the idea of a federated backpack, to how to design the assessment. all good!
- github wiki - the github wiki gets into describing the syntax and technical details of the OBI. Venturing into this wiki requires an intermediate level understanding of web development and JavaScript. Even if you don't have an intermediate understanding of things diving in can add to the learning and bring insight to how things work.
- github widgets source code - so far my focus is on how to use the OBI (not how to contribute to the OBI). As my focus remains on the implementation side having the opportunity to review other peoples code serves learning about the OBI very well.
- github source - so far I haven't had the need to dive into the OBI source code. To me this shows the maturity of what is available as a code base and in documentation. To develop an understanding of things I don't need to look at the source code. This may come later when I start to push the OBI capabilities, but for just wanting to earn, issue and display badges the OBI can be learned without diving into the source.
- taking apart and editing JSON files - taking apart and playing with the issuer JSON can go a long way to building understanding. Create a .json file on disk and push it into the validator. Look at each attribute and think about how it can be used.
{
  "recipient": "sha256$2ad891a61112bb953171416acc9cfe2484d59a45a3ed574a1ca93b47d07629fe",
  "salt": "hashbrowns",
  "evidence": "/badges/html5-basic/bimmy",
  "expires": "2013-06-01",
  "issued_on": "2011-06-01",
  "badge": {
    "version": "0.5.0",
    "name": "HTML5 Fundamental",
    "image": "/img/html5-basic.png",
    "description": "Knows the difference between a <section> and an <article>",
    "criteria": "/badges/html5-basic",
    "issuer": {
      "origin": "http://p2pu.org",
      "name": "P2PU",
      "org": "School of Webcraft",
      "contact": "admin@p2pu.org"
   }
  }
}
- blog posts by mozilla team members - when you come across mozillians online or through a retweet or rss feed follow through and follow them or subscribe to their feed. Often answers to you questions may come from a current or past post. Be thorough...
- blog posts by badge followers (both critical and supportive views) - its a really good idea to seek out other views of things. And there is another side to badges, read posts that are both critical and supportive of badges. Deepening your understanding in this way helps to broaden your learning about badges.
- all aspects of the open badges and Mozilla learning groups members are outstanding. They are incredibly helpful!
- you need to iterate around all the sites, groups, resources and references you can find. And loop around for second and third readings.
- you need to be an intermediate level developer with confidence around JavaScript
- you need to know a web programming language (Ruby, PhP, Python, Etc...).
- Deep diving into the json files forces a deeper understanding of the OBI.
- you need to be able to create a nice looking badge and save it as a png file.
- you need to understand assessment approaches.
Tuesday, May 15, 2012
Open Badges: Issuer vs. Displayer
Discussions, readings, review and reflection continues to deepen my understanding of the Open Badges Infrastructure (OBI). One item that is important, and has been given considerable thought by the Open Badges team, is the difference between an Issuer and a Displayer. As you start diving into open badges it could make sense that the issuer and displayer could be the same entity. It kind of makes sense; if Girl Scouts Canada issued a whole lot of badges to someone, why wouldn't they also provide the feature to display the badges that had been awarded to this person (the earner)?
The scout badge analogy continues to work well here. Once a badge has been issued to someone, where they display them and what they do with them through time is really up to the person who earned the badge. Upon reflecting on this I believe it would NOT make sense to leave the badge sash at the scout office because every time the badges were to be displayed the viewer would have to go to the scout office to see them. The better solution is to decouple the issuing of badges from the display of badges. This way the earner can choose how to display the badges for themselves;
 |
| http://www.flickr.com/photos/eezpictures/3299183408/ |
- Determine where to display their badges (personal blog, facebook, other...)
- Grouping the badges (volunteer activities, webmaking activities, professional development, community involvement, learning milestones, coursework, etc...)
- Organize badges from different issuers to create a greater meaning (or meta-credential)
Tuesday, May 08, 2012
Open Badges Interdisciplinary Opportunities

To increase and broaden your learning it is also a good idea to bundle your personal learning across subjects you have already personally committed.The idea being that if your learning crosses subject areas it will deepen for the skills and knowledge are being used more broadly and within different contexts. Currently, my ongoing learning covers two main subject domains; folk music and dance, and mobile first web development. In each of these two areas I am currently focused on the following;
- Folk Music and Dance
- I'll go enlist for the sailor - beautiful tune with a nice dance jig
- Folk style percussion instruments - well almost anything folk that can add rhythm
- Pipe and Tabor - if I had the time, I'd spend two hours a day blowing this whistle
- Mobile First and related Web Development
- HTML5 - the latest (and most mobile friendly) version of HTML
- CSS - the always improving cascading style sheets
- Advanced PhP - mostly focused on building RESTful API's
- node.js - currently deepening my understanding of this JavaScript framework
- popcorn maker - hacking rich media into stories and music videos
- HTML5 and CSS3 to render the User Interface for my badge displayer
- node.js to build my server side code for the issuer and host the backpack
- popcorn maker to create some rich media learning resources describing the OBI
Friday, May 04, 2012
Agile Instructional Design: PLAN

PLAN - this is the process of taking the learning vision from the previous step of the AID methodology (ENVISION) and planning the learning journey. As was previously discussed the methodology is an iterative process that can begin as soon as the first words of the knowledge domain have been identified. As planning begins it is a good idea to review the learning themes and the learner roles. It is the time while capturing and documenting the vision that planning would begin. Often within these design processes (whether individual or group) that the main planning items are easily identified early in the process. Often these are not immediately articulated; yet, this is where peoples intuition becomes apparent. As you work through the planning step items that seem most appropriate from the envisioning step bubble up and become the items of focus. These items should be recorded for the next iteration of envisioning. The steps of planning are as follows, and some of these items may change from iteration to iteration.

- Identify anchor subject - the anchor subject grounds the learning into a theme meaningful to the learner. A well chosen anchor will bring authenticity to learning and more deeply engage the learner through "role play" and bringing "fun" into learning. Finding an anchor that can span different course subjects (ie. science, language, history, maths, etc.) also allows the learner to explore the anchor from different perspectives which can deepen learning.
Outcomes: a written description, rich-media artifact or some other method of capturing a description of the anchor subject. The anchor subject should provide a collection of user stories to help clarify and increase understand-ability. - Identify interdisciplinary opportunities and requirements - how can the anchor subject and knowledge domain as a whole span more than a single discipline? Can the learning methods, approaches and lessons be utilized so learning can occur in many different areas? If the anchor subject was "pirates" it could be discussed in all courses. Economics would talk about the financial realities of being a pirate and the greater economics of the time. Language Arts could speak to the languages of the Caribbean or the South Asian Sea. Geography could explore the different regions of the world who have struggled with piracy. History could look at piracy through time. Technology classes could look at piracy as it applies to the modern age. With a well chosen anchor subject the interdisciplinary opportunities are numerous and will deepen learning.
Outcomes: a written list, concept map or other approach to identifying the interdisciplinary opportunities with descriptions of how they would be tied to a lesson or module. - Examine timeline, instructional strategies and research - There are many attributes toward determining the instructional strategies for any module, course or curriculum being built. The following are some of the attributes to be considered;
- Timeline and Schedule - how long is the course? the time of day? number of hours available?
- Geography - where are learners located? is this a classroom course, exclusively online, or blended? What resources are available given the geography?
- Access - what bandwidth is available? what technology resources are available given geographical restraints?
- Cohort - Who is the cohort of learners? how tech savvy are they? is discussion more appropriate?
- Pedagogical approaches - given the above restraints what will be the most effective learning environments. Should the approach be inquiry based, a MOOC, use constructivist theories or connectivist practices?
- Previous experience - Determine if there is research available for similar learning situations. What worked? How could things be improved?
- Research Opportunities - Are you capturing information from this learning development project to add to the research? Are you contributing back? Are you being transparent?
- Identify learning objectives and modules - once items 1 through 3 above are completed it comes time to review all the artifacts created and gathered from this step and the previous ENVISION step to identify learning objectives and learning modules. Keep in mind being agile, so the task of identifying objectives and modules can start at any time. Having stickies or a way of recording these for later review is a part of agility. Identifying objectives and modules should be fairly straight forward if the previous tasks and steps had depth. Surprisingly, the objectives and modules fall out of the information created and gathered.
Outcomes: a written list of learning objectives and identified learning modules. This should be published and made available for feedback and collaborative efforts.
 |
| Caribbean Pirate Map |
Outcomes: a table, mind-map, story or other approach that answers all the above questions formatted in a way to deepen understand-ability.
Getting started with open badges
So I added a bunch of content to Mozillas wiki page describing open badges. This page had very little content other than an image and some links. I really felt it needed to have a non-tech-savvy upgrade. I did my best to put getting started with open badges into more lay terms. With a few additional edits, this is what I ended up with...
Getting Started
Being on the steep side of a learning curve can sometimes seem overwhelming. And jumping into learning about digital badges is no different. If you iterate around three main concepts, and with each iteration deepen your understanding all will be good. If you have landed here without first reading the badges about page, it is suggested you go back and read what badges are all about; About Badges.
The Three Main Roles
There really is a whole bunch of technology that went into building open badges. Particularly, when you consider that all badges need to be confirmed as genuine and that loads of different organizations will be issuing badges. More on this as you deepen your understanding of badges. The first thing when developing an understanding of badges is to consider the three main roles of; earner, issuer and displayer. And how these three roles work together within the whole Open Badges Infrastructure (OBI).
The Earner
The earner is anyone who wants to earn a badge. And they are willing to focus their energy and make an effort to acquire the skills and knowledge that demonstrates their mastery represented by the badge. Badges are everywhere, and are particularly present in our youth. Girl Scouts can earn badges, Students in sailing school can earn badges, Swimmers can earn badges. It is these badge systems where people prove skills, knowledge and ability and from this they earn badges. If you want to jump deeper into understanding the technology behind the earner follow this link to the technical documentation of onboarding the earner.
and their Backpack
The earner will store their badges is a digital backpack. The backpack is the online digital place where the earner can store and manage their badges. By managing their badges they can be put into groups or be made private and not be available for display.
The Issuer
 The issuer creates the badge, figures out what skills and knowledge
are represented by the badge, and figures out how to assess (or prove)
if a person has the skills and knowledge to earn the badge. The issuer
has a lot of heavy lifting to do, this is because determining if someone
has mastered the skills and knowledge and are deserving of a badge
requires work and should be rigorous if the badge is going to hold
value.
The issuer creates the badge, figures out what skills and knowledge
are represented by the badge, and figures out how to assess (or prove)
if a person has the skills and knowledge to earn the badge. The issuer
has a lot of heavy lifting to do, this is because determining if someone
has mastered the skills and knowledge and are deserving of a badge
requires work and should be rigorous if the badge is going to hold
value.
There are may ways to assess peoples abilities and knowledge. Figuring out effective ways to assess these is also the responsibility of the issuer. The assessment methods used for the badges available in our youth are proven and have considerable rigor. For example, the assessment of the skills and knowledge to get a scouting badge is done with well articulated criteria and assessment forms within a master - apprentice model. Once the badge earner has proven their skills and knowledge against the criteria as assessed by the master, they are issued a badge. It should be noted that there are many approaches to assessment and what is described here is only one approach. The important thing is that the issuer needs to figure out how to assess if the earner is deserving of the badge. If you want to jump deeper into understanding the technology behind the issuer follow this link to the technical documentation of onboarding the issuer.
The Displayer
The displayer provides the ability to display badges. This could be a social media site like facebook or it could be your own personal wordpress blog. The displayer will retrieve badges from an earners backpack and display them for all to see. The groupings and permissions around the display of badges will be determined by the settings in the backpack. If you want to jump deeper into understanding the technology behind the displayer follow this link to the technical documentation of onboarding the displayer.
The Technology
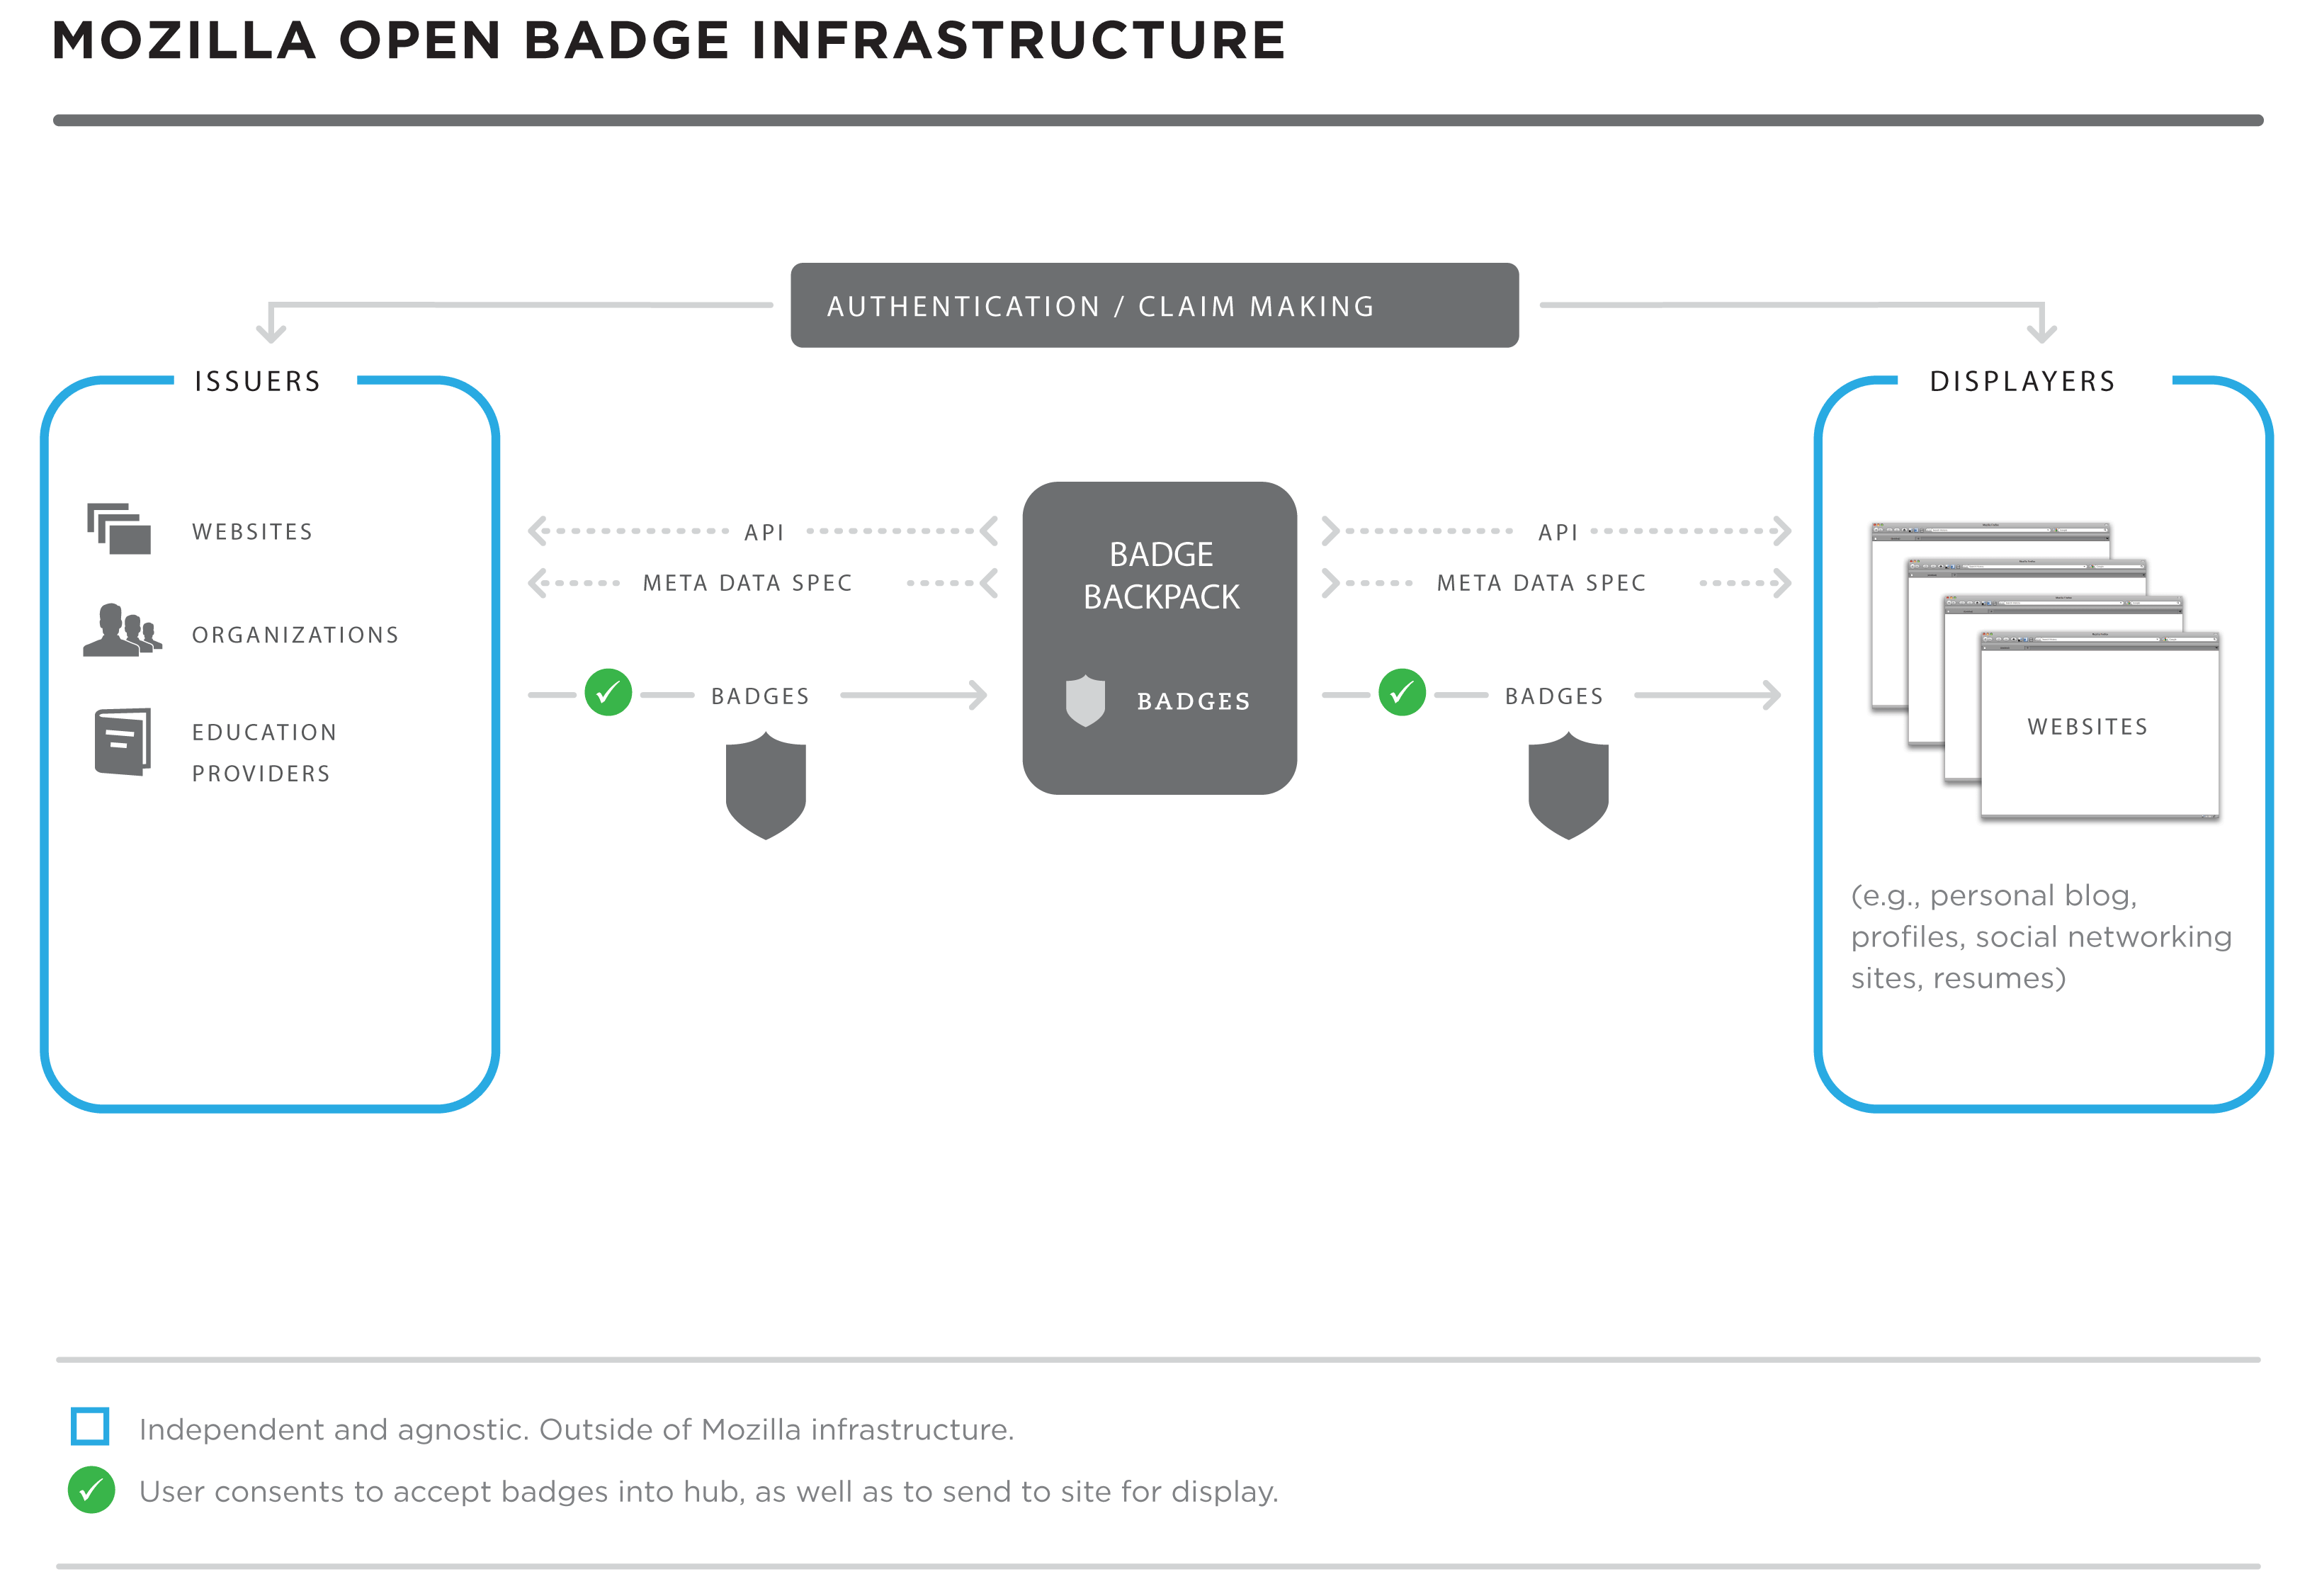 These three roles can be found in the diagram enclosed. The Issuers and
Displayers are obvious as they each have their own box in the diagram.
The Earner role isn't so obvious because, as a technology, the earner
becomes the backpack. You could say the Earner is holding their
backpack. From a technology perspective and an infrastructure view the
Issuer is the provider of badges, the backpack stores the badges earned
and the displayer shows them to the world.
These three roles can be found in the diagram enclosed. The Issuers and
Displayers are obvious as they each have their own box in the diagram.
The Earner role isn't so obvious because, as a technology, the earner
becomes the backpack. You could say the Earner is holding their
backpack. From a technology perspective and an infrastructure view the
Issuer is the provider of badges, the backpack stores the badges earned
and the displayer shows them to the world.
With a close inspection of the diagram above there are a number of boxes, lines, images, and text. All of these represent a piece of the technology that makes up the Open Badges Infrastructure. As you learn more about the badges technology you will become familiar with all the elements found in the diagram. Take the time to review the diagram, reflect upon the Earner, Issuer and Displayer roles and how they would interact to display a badge.
One question to really get you thinking is. "How do you determine if a badge is genuine?" Don't think about this from an open badges technology perspective, think about it from a real world girl scout badges or sailing school perspective. Think again, think further than if the badge looks official... "how would you really determine if a badge is genuine?"
Getting Started
Being on the steep side of a learning curve can sometimes seem overwhelming. And jumping into learning about digital badges is no different. If you iterate around three main concepts, and with each iteration deepen your understanding all will be good. If you have landed here without first reading the badges about page, it is suggested you go back and read what badges are all about; About Badges.
The Three Main Roles
There really is a whole bunch of technology that went into building open badges. Particularly, when you consider that all badges need to be confirmed as genuine and that loads of different organizations will be issuing badges. More on this as you deepen your understanding of badges. The first thing when developing an understanding of badges is to consider the three main roles of; earner, issuer and displayer. And how these three roles work together within the whole Open Badges Infrastructure (OBI).
The Earner
The earner is anyone who wants to earn a badge. And they are willing to focus their energy and make an effort to acquire the skills and knowledge that demonstrates their mastery represented by the badge. Badges are everywhere, and are particularly present in our youth. Girl Scouts can earn badges, Students in sailing school can earn badges, Swimmers can earn badges. It is these badge systems where people prove skills, knowledge and ability and from this they earn badges. If you want to jump deeper into understanding the technology behind the earner follow this link to the technical documentation of onboarding the earner.
and their Backpack
The earner will store their badges is a digital backpack. The backpack is the online digital place where the earner can store and manage their badges. By managing their badges they can be put into groups or be made private and not be available for display.
The Issuer
There are may ways to assess peoples abilities and knowledge. Figuring out effective ways to assess these is also the responsibility of the issuer. The assessment methods used for the badges available in our youth are proven and have considerable rigor. For example, the assessment of the skills and knowledge to get a scouting badge is done with well articulated criteria and assessment forms within a master - apprentice model. Once the badge earner has proven their skills and knowledge against the criteria as assessed by the master, they are issued a badge. It should be noted that there are many approaches to assessment and what is described here is only one approach. The important thing is that the issuer needs to figure out how to assess if the earner is deserving of the badge. If you want to jump deeper into understanding the technology behind the issuer follow this link to the technical documentation of onboarding the issuer.
The Displayer
The displayer provides the ability to display badges. This could be a social media site like facebook or it could be your own personal wordpress blog. The displayer will retrieve badges from an earners backpack and display them for all to see. The groupings and permissions around the display of badges will be determined by the settings in the backpack. If you want to jump deeper into understanding the technology behind the displayer follow this link to the technical documentation of onboarding the displayer.
The Technology
With a close inspection of the diagram above there are a number of boxes, lines, images, and text. All of these represent a piece of the technology that makes up the Open Badges Infrastructure. As you learn more about the badges technology you will become familiar with all the elements found in the diagram. Take the time to review the diagram, reflect upon the Earner, Issuer and Displayer roles and how they would interact to display a badge.
One question to really get you thinking is. "How do you determine if a badge is genuine?" Don't think about this from an open badges technology perspective, think about it from a real world girl scout badges or sailing school perspective. Think again, think further than if the badge looks official... "how would you really determine if a badge is genuine?"
Subscribe to:
Posts (Atom)